SAP ABAP Tutorial for Beginners: Building Proficiency in ABAP Development

SAP (Systems Applications and Products in Data Processing).

Sap Abap | Tutorial


Some Non ERP:-  VB/JAVA – Front end 
                              ORACLE – Back end

Some ERP Products:-
  •  BAAN
  •  RAMCO
  •  PEOPLE SOFT
  •  ORACLE APPS
  •  SAP
ERP:-
  • It provides predefined tables.
  • It provides predefined application programs.
  • No need to creating & maintaining tables.
  • No need to write the programs for fetches the data from database.
BAAN:-

 Nearly 90% of database tables & source code are related to customers &
vendors, so it is suitable for small size & mid size companies.
E.g.: Vijaya Electronics.

RAMCO:-

 Nearly 80% of database tables & source code are related to the
finance. Hence it is suitable for financial companies. So, it is also suitable for small
size and mid size companies.
E.g.: Any automobile company.

People soft:-
 This is good for HR department but weak in relationship with other
departments (like Production, Purchasing, Warehouse, FI/CO, Shipping, Sales
and Distribution).

ORACLE APPS:-

 This is good for Finance department but weak in integration
with other departments (like Production, Purchasing, Warehouse, Shipping, HR,
Sales and Distribution).

SAP:-

 SAP is good for all modules but weak in FI/CO and HR departments
when compared with PEOPLE SOFT and ORACLE APPS.

Enterprise Portal: - It is used for integrating with one module to another module.
SAP can integrate with People Soft and Oracle Apps and so on.

ADVANTAGES OF SAP:-
  •  It is tightly (or) closely integrated across all the modules (or) departments.
  •  SAP is platform independent irrespective of all Operating System (Windows, Linux, UNIX etc...)
  • SAP is developed in multi languages as well as multicurrencies.It is used to communicate with international customers and vendors.
  • SAP is a ready made product, which is developed in 1972 with five IBM employees in Germany. Customization is done within a minimum effort.
  • SAP contains Cross Applications, so that exchange the data from one system to another system.

 CROSS APPLICATION (CA):-                               
                                                           
 ALE (Application Link Enabling) is an SAP technology to support cross  
application.
ALE uses Idoc to support the transformation.

Note:  
Before coming the ALE, SAP uses the EDI (Electronic Data Interchange).
Idoc is Intermediate Document to carry the data.


XI - Exchange Infrastructure. It is the SAP Enterprise Application Integration (EAI).  

TIBCO – The information bus company. 

INTRODUCTION 

  • ABAP: Advanced Business Application Programming Language.
  • It is a 4th generation language.
  •  ABAP is not a case sensitive.
  •  Based on this language they developed remaining modules (MM, SD,FI……).
  •  ABAP is not a syntax language; it is a business oriented language.
  •  Source code of an ABAP consists of statements as well as comment.
  •  A statement is a combination of Operators, Operands, and Variables &

Keywords:

 In ABAP we have 3 types of operators. They are:

1. Mathematical Operators.
2. Comparative Operators.
3. Relational & Logical Operators.

1) Mathematical Operators:


2) 
 Comparative Operators:


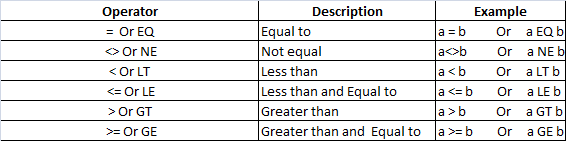
3) Relational & Logical Operators:


Operands: Operands are the variables which we need to perform particular operation. 

Variable:

 Variable is the name given to memory location.

Keywords:

 Keywords are used to identify the type of statements.

1. Calling Keywords.
2. Controlling Keywords.
3. Definition Keywords.
4. Declarative Keywords.
5. Database Keywords.
6. Event Keywords.
7. Operational Keywords.

 Declarative Keywords are used to declare the variable.
 Some of them are DATA, PARAMETERS, TABLES and TYPES.

Comments:

 Comments are non executable statements. These are used to
improve the readability of the program.
 
  • If you want to comment the entire line then we place '*' at the first Column of the line.                  E.g -  * Addition of two numbers.
  • If you want to comment the part of the line then we use ".                                                          E.g.: c = a + b  "Logic.
Data types:

 There are two types of Data types:

1. Numeric Data types.
2. Character Data types.

Numeric Data types:
  • Integer I 
  •  Float F 
  •  Packed decimal P
Character Data types:
  • Char C and Numeric Char N
  • Dates D 
  • Times T

Here I, F, Date (D), Time (T) are fixed length Data types.
P, N & D are variable length data type. 

Syntax of Integer I:-

DATA <variable name> Type I
E.g.: DATA A Type I
The initial value of integer is '0'.


Syntax of Float F:-

DATA <variable name> Type F
E.g.: DATA A Type F
The initial value of float is '0.00'.

Syntax of Packed decimal P:-

DATA <variable name> (<length>) Type P decimals (no of 0‘s)
E.g.: DATA A (5) Type P decimals 3.
The initial value of packed decimal is after '.' 
Num of decimals '0.000'.

Syntax of Char C:-

DATA <variable name> (<length>) Type C
E.g.: DATA A (5) Type C
The initial value of char is space/empty.

Syntax of Numeric Char N:-

DATA <variable name> (<length>) Type N
E.g.: DATA A (3) Type N
The initial value of numeric char is '000' (based on length).

Syntax of Dates D:-

DATA <variable name> Type D
E.g.: DATA A Type D
The initial value of date is '00000000'.
The initial format is 'YYYYMMDD'. 

Syntax of Time T:-

DATA <variable name> Type T
E.g.: DATA A Type T
The initial value of date is '000000'.
The initial format is 'HHMMSS'.

Basic Program In C Programming Language:  


Int a, b, c;
a=10; 
b=20;
c=a+b;
Printf ("%d", c);

Output - 30

Basic Program In ABAP.

DATA: A Type I,
            B Type I, 
            C Type I.
A=10.
B=20.
C=A+B.
Write C.

Output - 30

NOTE:-

1. In ABAP each statement ends with dot '.'
2. Write‘ is the operational keyword, used to display the output.
3. If more than one variable having a same keyword instead of maintaining the same keyword we use chain operator ':' & variables are separated by comma ','.
4. We must leave single space between each operator & operand. 

Steps to create the program:- 

  • Execute SE38 (ABAP Editor).
  • Provide program name starts with ―Y or Z. E.g. Z_NSN_ADDITION.
  •  Click on create
  •  Provide title – type is executable – i.e., we can execute the program without depends on any other program.
  • Click on save (enter).
  •  Click on local object (it means our program will be saved on $TMP Development Class or Package which is created by SAP) OR you can also create your own package using SE21 tcode.
Steps to Execute the program:-

  • Save the program (ctrl+s).
  • Check the program (ctrl+F2).
  • Activate the program (ctrl+F3).
  • Test the program (F8).
  • Back (F3).
NOTE:-

Parameter is the keyword which accepts the value/input from the
keyboard at the runtime.

for e.g:

In C programming 


Int a, b, c; 
Scanf ("%d, %d", &a, &b);
C=a+b;
Printf ("%d", c);

Output - a = 10
                b = 20
                c = 30

In Abap:


Parameter: A Type I, 
                   B Type I.
 DATA C Type I.
 C = A + B.
 Write C.

Output - a = 10
                b = 20
                c = 30

NOTE:-

1. The name of the parameter should not exceed 8 character length.

2. The parameter cannot accept data type F.

3. DEFAULT is the keyword which is used to assign the default values to the
parameter variables.
Syntax:-
 Parameter <variable name> Type <DT> default <value>.
 E.g.: parameter A Type I default '10'. ( ' ' is your wish for integers).
 
4. OBLIGATORY is the keyword which is used to provide the input field as
mandatory field.
Syntax:-
 Parameter <variable name> Type <DT> obligatory.
 E.g.: parameter A Type I obligatory.

Structure of an ABAP program:- 


Header:- (only in real time)

***************************************************
* Program          : Z_NSN_ADDITION                                     *
* Author             : Salman                                                           *
* Purpose           : Addition of two numbers                               *
* Start date         : 02/06/10                                                        *
* Finish date      : 02/06/10                                                         *
* Modified by    :                                                                        *
* Modified date :                                                                        *
* Supplier          : TVS Technologies                                         *
* Package          :                                                                        *
***************************************************

Declarations:- 


Business Logic:- 

In ABAP business logic is retrieving/to get the data from a database & display it in a predefined format.

Reusable Blocks:-  


SQL:-
Structured Query Language.

  • SQL is the database dependent where as SAP is the database independent. So that, SQL does not support SAP.
  • Open sql support SAP, because open sql is database independent.
  • Open sql does not support DDL, so that we can‘t create tables with simple statements like oracle.
  • Open sql supports DDIC (Data Dictionary) which is used to create the tables as well as alter the tables in SAP. 
DDIC:- 

  • Data Dictionary is the central source of the database management system.
  • The main functionality of the data dictionary is to create the tables as well as altering the tables.
  • There are two ways of creating the tables by using DDIC. They are :
1. Direct method/Built in method/Predefined method.
2. Data element method.

Technical requirements to create the table:-

1. Name of the table: In ABAP the name of the table must be starts with  'Y' or 'Z' because A to X are reserved for SAP.
2. Provide the list of fields, data types & length.
3. Provide delivery class: Delivery class defines the owner of the table, as well as controls the transport of the data from one table to another.
4. Provide the technical settings.
Technical settings are:
1. Data class.
2. Size category.

Data Class:-

It defines the physical area of the database in which our table is logically stored.

Some of the important data classes are:

1. APPL0 – Master data class.
2. APPL1 – Transactional data class.
3. APPL2 – Organizational data class.

Master Data class:-

 Master data is the data in which the data is accessed frequently & updated rarely.
 E.g.: Vendor master data.
          Customer master data.
          Material master data.

Transactional Data class:-
 
Transactional data is the data in which the data is accessed frequently & updated frequently.
 E.g.: Purchase order data.
          Sales order data.

Organizational Data class:-
 
Organizational data is created when the system is implemented.
E.g.: Company data
         Plant data.

Size Category:-
 
Size category determines the probable space required for the table.

Steps to create the table by using Direct method or Predefined type:-
  •  Execute SE11 (DDIC).
  •  Make sure select the radio button database table.
  •  Provide table name.
  •  Click on create.
  •  Provide short description.
  •  Provide delivery class 'A'.
  •  Select the table maintenance allowed.
  •  Click on fields tab – click on predefined type.
  •  Provide the field names, data type, length & short description.
E.g.:


NOTE:-

  • Each table must have atleast one field as a primary field that should be the character data type & that should be first field in the table.
  •  Save the table. (Ctrl + s).
  •  Check the table (ctrl + F3).
  •  Click on technical settings
  1.  Provide data class (APPL0, APPL1 …).
  2.  Select the size category (0).
  3.  Save the technical settings.
  4.  Come back.
  •  Activate the table.
Steps to provide the data to the table:- 

∙ In the menu bar click on utilities – table contents – create entries. 
∙ E_ID  - 1 
∙ E_Name  - SPRAO 
∙ E_Add  - Sanath nagar. 
∙ Save – back. 

Steps to display the data:- 

∙ In the menu bar – utilities – table contents – display. 
∙ Click on execute (F8). 

NOTE:- 

1. If you want to provide the data to the table manually then we must  select table maintenance allowed. 
2. We can provide up to 16 primary keys per a table. 


Domain:- 

 Domain is the combination of data type & length. 

Data Element:-

 It is the combination of domain & short description. 

Creation of a table by using data element type:-  


Steps to create Domain:- 

∙ Execute SE11. 
∙ Select the radio button domain. 
∙ Provide your domain name (YSPRAO_730_Eid). 
∙ Click on create. 
∙ Provide any short description (domain). 
∙ Provide data type & length. 
∙ Save the domain. 
∙ Check the domain. 
∙ Activate the domain. 
∙ Repeat the same steps to all the domains. 

Steps to create Data element:- 

∙ Execute SE11. 
∙ Select the radio button data type. 
∙ Provide your data element name (YYSPRAO_730_Eid). 
∙ Click on create – enter. 
∙ Provide any short meaningful description (id of the emp). ∙ Provide domain name which is already created – enter. 
∙ Save the data element. 
∙ Check the data element. 
∙ Activate the data element. 
∙ Repeat the same procedure for all the data elements. 

Steps to create the table by using data element type:- (Bottom-up approach)
 
∙ Execute SE11. 
∙ Select the radio button database table. 
∙ Provide your table name (YSPRAO_730_Emp1). 
∙ Click on create – enter. 
∙ Provide any short meaningful description (Emp table by using bottom-up  approach). 
∙ Provide delivery class (a). 
∙ Select the maintenance allowed. 
∙ Click on the fields tab. 
∙ Provide the field names, data elements.  
∙ Save the table. 
∙ Check the table. 
∙ Click on technical settings. 
∙ Provide data class & size category. 
∙ Save the technical settings. 
∙ Come back.
∙ Activate the table. 

Steps to create the Emp table by using Top-down approach data type  element:- 

∙ Execute SE11. 
∙ Select the radio button database table. 
∙ Provide your table name (YSPRAO_730_Emp1). 
∙ Click on create – enter. 
∙ Provide any short meaningful description (Emp table by using Top-down  approach). 
∙ Provide delivery class (a). 
∙ Select the maintenance allowed. 
∙ Click on the fields tab. 
∙ Provide the field name (Eid) & data element name which is not there  (ZZSPRAO_730_Eid).
∙ Double click on the data element – save before editing – yes – local object – cerate the data element – yes. 
∙ Provide a meaningful description. 
∙ Provide domain name which is not created (ZSPRAO_730_Eid). 
∙ Double click on domain – save before editing – yes – local object – yes. 
 ∙ Provide a short description, data type & length. 
     Eid         ZZSPRAO_730_Eid 
  
  
∙ Save the domain. 
∙ Check the domain. 
∙ Activate the domain. 
∙ Come back. 
∙ Save the data element. 
∙ Check the data element. 
∙ Activate the data element. 
∙ Come back. 
∙ Repeat the same for all the fields. 

NOTE:- 

1. In the real time always create the table by using data element type,  because if we want to establish the relationship between any two  tables we need common domain name in both the tables. 
2. In the Direct/built-in type there is no domain concept. 

Foreign Key Relationship:- 

Foreign key is a field in one table i.e., connected with another table via, foreign key relationship. The purpose is to validate the data  being entered in one table (foreign key table) by checking against list of possible  values in another table i.e., check table.  


Technical requirements to establish the primary & foreign key relationship:- 

∙ The domain name of both the fields in both the tables must be the same. 
∙ The check table field must be the primary field. 

Steps to establish the Foreign key relationship:- 

∙ Execute SE11. 
∙ Select the radio button database table. 
∙ Provide your foreign key table name. 
∙ Click on change mode. 
∙ Select the field (for which field we want to establish foreign key  relationship). 
∙ Click on foreign key icon. 
∙ Provide your check table name. 
∙ Click on generate proposal. 
∙ Enter. 
∙ Save the table. 
∙ Check the table. 
∙ Activate the table. 

Some of the standard database tables:-
 
1. T001 — Company code table. 
2. KNA1 — Customer master table. 
3. LFA1 — Vendor master table. 
4. MARA— Material master table. 

Some of the fields in T001:- 

1. BUKRS — Company code. 
2. BUTXT — Company name. 
3. ORT01 — City of the company. 
4. LAND1 — Country. 
5. SPRAS — Language. 

Some of the fields in KNA1:- 

1. KUNNR— Customer number. 
2. NAME1 — Name of the customer. 
3. ORT01 — City of the company. 
4. LAND1 — Country. 
5. SPRAS — Language. 

Some of the fields in LFA1:- 

1. LIFNR — Vendor number. 
2. NAME1 — Name of the vendor. 
3. ORT01 — City. 
4. LAND1 — Country. 
5. SPRAS — Language. 

Working with reference fields:- 

∙ When ever we are working with amount field then we must provide  reference as Currency field
∙ When ever we are working with quantity field then we must provide  reference as Unit field


Steps to establish the link to the reference fields:- 

∙ Select the quantity or amount field. 
∙ Click on currency/quantity fields tab. 
∙ Provide your reference field name & reference table. 

NOTE:- 

1. T006 is the standard database table which contains all the unit of  measurement (UOM). 
2. TCURC is the standard database table which contains all the currencies. 
3. If you want to display the particular filed information click on  contents – in the menu bar – settings – format list – choose fields – select your required fields – enter – execute.  
 

INTERNAL TABLES

∙ Internal tables are collection of records. 
∙ Internal tables are temporary tables, i.e., the data in the internal table will not  save any where in the sap. 
∙ Internal tables are dynamic memory allocation, i.e., we need not to provide  size of the internal table. 
∙ The scope of the internal table is up to that program. 
∙ Placing the data in to the internal table or reading the data from the internal  table is always record by record i.e., through work area.  


NOTE:- 

 APPEND is the keyword to transfer the data from work area to internal  table. 

Program:- 


 DATA: Begin of Emp, 
 Eid (10) Type C, 
 Ename (25) Type C, 
 Eadd (35) Type C, 
 End of Emp. 

DATA Emp1 like table of Emp. 

Emp-Eid = '1'. 
Emp-Ename = 'SPRAO'. 
Emp-Eadd =  'SANATH NAGAR'.
Append Emp to Emp1. 

Emp-Eid = '2'. 
Emp-Ename = 'RAJ'. 
Emp-Eadd = 'KPHB'. 
Append Emp to Emp1.
 
Emp-Eid = '3'. 
Emp-Ename = 'SANDEEP'. 
Emp-Eadd = 'BEGUMPET'. 
Append Emp to Emp1.
 
Loop at Emp1 to Emp. 
Write: / Emp-Eid, 
 Emp-Ename, 
 Emp-Eadd. 
End Loop. 


Type is used to refer the data types or data elements. 
Like is used to refer the variables or fields.
 
Object:- 

 To display the company codes, company names & cities (BUKRS, BUTXT, ORT01) . 

DATA: Begin of WA, 
 BUKRS like T001-BUKRS, 
 BUTXT like T001-BUTXT, 
 ORT01 like T001-ORT01, 
 End of WA. 

DATA IT like table of WA. 

Select BUKRS BUTXT ORT01 from T001 into table IT. 

Loop at IT into WA. 
Write: / WA-BUKRS, WA-BUTXT, WA-ORT01. 
EndLoop.

NOTE:- 

 The order of the fields in the work area as well as the order of the fields in  select query must be same. 

Object:- 
 To display the Vendor numbers, Vendor names, & Countries. 


Differences between Database tables & Internal tables:- 


Object:- 

 To display the customer numbers, customer names, cities & countries(KUNNR, NAME1, ORT01, LAND1) 

DATA: Begin of WA, /*work area started*/ 
 KUNNR like KNA1-KUNNR, 
 NAME1 like KNA1-NAME1, 
 ORT01 like KNA1-ORT01,
 LAND1 like KNA1-LAND1, 
 End of WA. /*work area ended*/. 

DATA IT like table of WA. /*Internal table created*/. 

Select KUNNR NAME1 ORT01 LAND1 from KNA1 into IT. 

Loop at IT into WA. 
Write: / WA-KUNNR, WA-NAME1, WA-ORT01, WA-LAND1.
EndLoop. 

Types of Internal Tables:- 


Standard Internal Table:- 

∙ It accepts duplicate records. 
∙ Here all fields are non-unique fields. 
∙ Pushing data from work area to internal table is always through APPEND keyword. 
∙ Searching of a record is through LINEAR search. 

Syntax:- 

 DATA <Internal Table name> like standard table of <work area name>. 
E.g.: DATA IT like standard table of WA. 

Sorted Internal Table:-
  
∙ It won‘t accept duplicate records. 
∙ Here we must specify at least one field as unique or non-unique fields. ∙ Pushing data from work area to internal table is always through INSERT keyword. 
∙ Searching of a record is through BINARY search. 

Syntax:-

 DATA <Internal Table name> like sorted table of <work area name> with  unique/non unique key <field1> <field2>……. 
E.g.: DATA IT like sorted table of EMP with unique key EID. 

Hashed Internal Table:-
 
∙ It won‘t accept duplicate records. 
∙ Here we must specify at least one field as unique field. 
∙ Pushing data from work area to internal table is always through COLLECT keyword. 
∙ Searching of a record is through HASHED ALGORITHM i.e., Midpoint  algorithm. 

Syntax:- 

 DATA <Internal Table name> like hashed table of <work area name>  with unique/non unique key <field1> <field2>……. 
E.g.: DATA IT like hashed table of EMP with unique key EID. 

NOTE:- 
 
In the real time we always work with standard internal tables because, we  are working with the data in the database. In the database there will be no  duplicates. 

Types of Declaring the Internal Tables:- 

1) If you want to declare some of the fields from any one of the database. 


2) If you want to declare all the fields from any one of the database table.  
Syntax:- 


3) Declaring the internal tables by referring database tables. 


4) Declaring the work area by using TABLES keyword. 


∙ By default TABLES keyword creates one WA with the name of database table  name & also contains    all the fields in database table. 
∙ Declaring the internal table by using TYPES keyword. 


Object:- 

 To display the all the fields from LFA1 table. 


∙ Declaring the internal table‘s with Header line. 

By default header line creates one work area with the name of internal table  i.e., the name of the work area as well as the name of the internal table is  same. 

∙ Declaring the internal table with header line by using OCCURS keyword. 

Syntax:- 


 Here IT_T001 acts as an internal table with header line, i.e., it creates one  work area with the name of internal table name i.e., IT_T001. 

NOTE:- 

1. Here OCCURS 0 allocates 8KB of memory for internal table. 
2. If the data in the internal table exceeds 8KB then it brings one more  8KB of memory up to 2GB.
3. OCCURS N allocates N records of memory for the internal table; if  the data in internal table exceeds N records of memory then it brings  one more N records of memory up to 2GB.  

∙ Declaring the internal table with header line by using Types keyword. 

      Syntax:- 


Initializing Techniques of Internal Table:- 

1. Clear. 
2. Refresh. 
3. Free. 

Clear:- 
 Clear always used to clear the contents of the work area only. 


 Clear also clears the contents of the internal table.


NOTE:- 

1. In the real time, we never use clear to clear the contents of internal  table. 
2. If we are working with internal table with header line then the name of  he work area as well as the name of the internal table are same, in this  situation also clear clears the contents of the work area. 
3. If you want to clear the contents of the internal table then we use '[]' to the internal table.  
E.g.: Clear IT_T001. 
  
  
Refresh:- 
 
 Refresh always clears the contents of the internal table only. 


NOTE:- 

 If we are working with internal table with header line then the name of  work area as well as the name of the internal table are same, in this situation also  refresh clears the contents of the internal table only. 

Free:-
 
∙ Free acts like Refresh. 
∙ Refresh clears the contents of the internal table only not the memory which  is allocated for that internal table, where as free clears the contents of the  internal table as well as the memory which is allocated for that internal table. 


Attributes of Internal Table:- 
 

Kind:- 

 Kind is the keyword which returns the type of the internal table. 
∙ If it is a standard internal table then it returns T. 
∙ If it is a sorted internal table then it returns S. 
∙ If it is a hashed internal table then it returns H. 

Lines:-

 Lines is the keyword which returns number of records available in the  internal table. 


Operations on internal tables:- 
  
∙ Pushing the data from work area to internal table by using 
1. Append. 
2. Insert. 
3. Collect. 


∙ Modify the internal table by using MODIFY keyword. 
∙ Delete the data from the internal table by using DELETE keyword (other than  clear, refresh). 
∙ Sort the data in the internal table, by using SORT keyword.

Append:- 

 Append is the keyword which is used to append/transfers the data from  work area to at the last record of internal table. 

Syntax:- 


Insert:- 

 Insert inserts the data from work area to internal table based on the key  field. 

Syntax:- 

Collect:- 
 
Collect checks the internal table if the inserted record is there/available or  not. If not, it acts like insert keyword; otherwise it adds the numeric fields from  work area to nu8meric fields in the internal table. 

Syntax:- 


Retrieving the data from database table & placing it into internal table:- 


Reading a single record from the internal table based on condition:- 

Reading multiple records from the internal table by using loop at keyword:-  
 

Modify the internal table by using MODIFY keyword:- 

∙ This is the two step procedure. 
1. Fill the latest data into work area. 
2. Modify the internal table. 

Delete the data from internal table based on Index:- 


∙ If you are not mentioning any condition then it deletes the data entirely in the  internal table. 

Sort the data in the internal table:- 


Checking the internal table:- 


Control structures:- 

 Control structures are used to control the execution sequence  of a program. 


E.g.: 

parameter day type I. 
If day= '1'. 
Write 'sun‘. 
Elseif day= '2'.
Write 'mon‘. 
Elseif day= '3'. 
Write 'tue'. 
Elseif day=‘7‘. 
Write 'sat'. 
Else  
Write 'invalid day'. 
Endif.  


Note:- 

 In the real time we always use case instead of nestedif, because case is  faster as well as clear than if.  
  
While:- 

Syntax:- 

While <condition>. 
Block of statements.
Endwhile. 


Note:- 

 In the real time we always use while instead of do, because while is faster  than do. 

Open SQL:- 


Note:- 

1. Open SQL is used to work with databases not with internal tables. 
2. Insert, Update, Modify & Delete a single record in to the database table is  always through work area & multiple records through internal table. 
3. When ever we are working with database tables then we must declare the  structure of work area as well as structure of the internal table as similar as  database. 

Insert single record:- 

 Insert inserts a record in to the database table if there is no match found in the database based on the key field. Otherwise it ignores the  records. 


Note:- 

SY-SUBRC is the system variable which contains '0' if the above statement  executed successfully. Otherwise it contains 'non-zero' (mot of times it contains 4).


Insert (multiple records):- 

 Insert inserts the multiple records in to the database table if there is no match found in the database table for all records in the internal  table based on the key field. If at least one record is matched then it ignores all the  records in the internal table as well as terminates the entire transaction. 


Note:- 

If you want to avoid the termination of the program then we use accepting  duplicate keys in the syntax of insert. 


∙ The above statement avoids the termination of the program as well as inserts the  non-duplicate records & ignores the duplicate records.

Note:- 

SY-DBCNT is the system variable which returns number of records  successfully inserted in to the database table. 

Update (single record / over write):- 

Update updates the data in to the database.
if there is a match found in the database based on the key field otherwise it ignores  the record. 


Note:- 

In this case, we must pass changed information along with old information  in the work area. 


Update multiple records:- 

∙ It is similar as update single record. 


Update particular column:- 


Modify:- 

∙ Modify acts like update if there is a match found in the database based on the  key field otherwise it acts like insert.
∙ Modify never fails. 


Delete:- 

 Delete deletes the data from the database based on condition. 


Commit work:-

This command is used to commit the database after changed  happen in the database. 

Syntax:- 

Commit work. 

Rollback work:- 

This command is used to undo the database operations. 

Syntax:- 

Rollback work. 

Select-options:- 

Select-options is a keyword which accepts single value,  
multiple single values, single range, multiple single ranges.


Note:- 

The name of the select-options acts as an internal table with header line. i.e.,  the name of the work area as well as the name pf the internal table is the similar  name of the select-options. 

Components/ fields of the select-options:- 

1. Low – the low value of the select-options. 
2. High – the high value of the select-options. 
3. Sign – include (I) or exclude (E). 
4. Option – between (BT) or not between (NB) 
 Equal (EQ) or not equal (NE). 


Note:- 

By default select-options contain sign is include option is between. 

Object:-

 Based on the given company codes to display the company codes,  company names, and cities. 


Note:- 

∙ In the real time when ever we are working with plants, storage  locations then we remove the intervals. 


∙ In the real time when ever we are working with dates then we remove the  extension. 

 
∙ If you want remove the both extensions and intervals. 

Note:-

In the real time when ever we are working with company code, if it is only  one company then we remove the extension and the interval.  

Some of the standard database tables:- 

MARA:- Material master table 

1. MATNR – Material number. 
2. MTART – Material type. (Material type means raw material, semi material,  finished material) 
3. MATKL – Material group. 
4. BISMT – Old Material. 
5. MEINS – UOM. 

KNB1: Customers under company 

1. BUKRS – Company code. 
2. KUNNR – Customer number. 
3. AKONT – Recon account. 
4. PERNR – Personal number. 

LFB1: Vendors under company 

1. BUKRS – Company code. 
2. LIFNR – Vendor number. 
3. AKONT – Recon account. 
4. PERNR – Personal number. 

MARC: Material and plant table 

1. MATNR – Material number. 
2. WERKS – Plant. 
  
JOINS:- 

 Joins are used to retrieving the data from more than one table. There  are two types of joins  
 1. Inner join  
 2. Left outer join  

Inner join:-

Inner join pick the data from both the tables if and only if there is one  or more than one entry is available in right hand side table with corresponding left  hand side table. 


Object:- 

To display the company codes, company names, and customer number  under company.  
  
Program:- 

 Data: Begin of  WA_ FINAL, 
 BUKRS like T001_BUKRS, 
 BUTXT like T001_BUTXT, 
 ORT01 like T001_ORT01, 
 End of WA_ FINAL. 
 
Data IT_ FINAL like table of WA_ FINAL. 

Select T001~BUKRS T001~BUTXT KNB1~KUNNR into  
table IT_FINAL from T001 Inner join KNB1 on  
 T001~BUKRS=KNB1~BUKRS.  
  
 Loop at IT_FINAL into WA_FINAL.
Write: / WA_FINAL-BUKRS, WA_FINAL-BUTXT, WA_FINAL-KUNNR. 
 Endloop. 

Some of the database tables:- 

EKKO:- purchasing document header table 

EBELN – purchasing document number. 
BSART – document type. 
EKORG – purchasing organization. 
LIFNR – vendor number. 
BUKRS – company code. 

EKPO:- purchasing document item table 

EBELN – purchasing document number. 
EBELP – item number. 
MENGE – quantity. 
MEINS – UOM (unit of measurement). 
NETPR – net price. 
MATNR – material number. 

MAKT:- material description table 

MATNR – material number. 
SPRAS – language. 
MAKTX – material description. 

T001W:- plant description table  

WERKS – plant number. 
NAME1 – name of the plant. 

Object:- 

 Based on the given material to display the material number, material type  & material description. 

MATNR MTART MAKTX


NOTE:- 
1. SY-LANGU is the system variable which contains current language. 
2. If any table contains SPRAS as a primary field then we must consider the  language in the where condition at the time of retrieving the data from  that table. 

Object:-

Based on the given vendor number to display the vendor number, vendor  type, purchasing document number, document type, item number, quantity, UOM  & net price. 


Program:- 

Data V1 like LFA1-LIFNR. 

Select-options S_LIFNR for V1.

Data: Begin of WA_FINAL, 
LIFNR like LFA1-LIFNR, 
NAME1 like LFA1-NAME1, 
EBELN like EKKO-EBELN, 
BSART like EKKO-BSART, 
EBELP like EKPO-EBELP, 
MENGE like EKPO-MENGE, 
MEINS like EKPO-MEINS, 
NETPR like EKPO-NETPR, 
End of WA_FINAL. 

Data IT_FINAL like table of WA_FINAL. 

Select LFA1~LIFNR LFA1~NAME1 EKKO~EBELN  
EKKO~BSART EKPO~EBELP EKPO~MENGE EKPO~MEINS  EKPO~NETPR into table IT_FINAL from LFA1 inner join EKKO on  LFA1~LIFNR = EKKO~LIFNR inner join EKPO on EKKO~EBELN  = EKPO~EBELN where LFA1~LIFNR in S_LIFNR. 

Loop at IT_FINAL into WA_ FINAL. 
Write: / WA_ FINAL-LIFNR, WA_ FINAL-NAME1, WA_ FINAL EBELN, WA_ FINAL-BSART, WA_ FINAL-EBELP, WA_ FINAL MENGE, WA_ FINAL-MEINS, WA_ FINAL-NETPR. 

Endloop.  

Some other database tables:- 

LFBK:- vendor bank table 

LIFNR – vendor number. 
BANKS – bank country key. 
BANKL – bank key. 
BANKN – account number. 

KNBK:- Customer bank table 

KUNNR – customer number. 
BANKS – bank country key. 
BANKL – bank key. 
BANKN – account number.

Assignment:- 

 Based on the given customer to display the customer numbers,  names, recon accounts, bank country   key, bank key & account number. 


Program:- 

Data V1 like KNA1-KUNNR. 

Select-options S_KUNNR for V1. 

Data: Begin of WA_FINAL, 
KUNNR like KNA1-KUNNR, 
NAME1 like KNA1-NAME1, 
AKONT like KNB1-AKONT, 
BANKS like KNBK-BANKS, 
BANKL like KNBK-BANKL, 
BANKN like KNBK-BANKN, 
End of WA_FINAL. 

Data IT_FINAL like table of WA_FINAL. 

Select KNA1~KUNNR KNA~NAME1 KNB1~AKONT  
KNBK~BANKS KNBK~BANKL KNBK~BANKN into table  IT_FINAL from KNA1 inner join KNB1 on KNA1~KUNNR =  KNB1~KUNNR inner join KNBK on KNB1~KUNNR =  
KNBK~KUNNR where KNA1~KUNNR in S_KUNNR. 

Loop at IT_FINAL into WA_FINAL. 
Write: / WA_FINAL-KUNNR, WA_FINAL-NAME1, WA_FINAL AKONT, WA_FINAL-BANKS, WA_FINAL-BANKL, WA_FINAL BANKN. 
Endloop. 

Left outer join:- 

Left outer join pick the data from left-hand side table even though there is no match found in the right-hand side table. 

___________________________________________________________________________________

Report:- 

Report is a combination of giving inputs through the selection-screen,  retrieving the data from the database based on the given input & displays it in a  free defined format. 

Syntax of Selection-screen:- 

Selection-screen begin of block <block name> with frame title text-<no>. 
Input fields. 
Selection-screen end of block <block name>. 

Syntax of Check box:- 

Parameter <name of the check box> as check box. 
E.g.: 
Parameter P_D is as check box.

Syntax of Radio button:- 

Parameter <name of the radio button> radio button group <group name>. E.g.: 

Parameter: P_MALE radio button group G, 
                  P_FEMALE radio button group G. 

Selection-screen Design:- 

Data V1 like T001_BUKRS. 
Selection-screen begin of block B with frame title text-001. 
Select-options S_BUKRS for V1. 
Parameter: P_Dis as check box, 
                   P_Non Dis as check box. 
Selection-screen end of block B. 


Note:- 

∙ If you want to provide the meaningful txt to the input variable, then you  go to; menu bar – go to –        text elements – selection texts. 
∙ Select the check box, if the field is coming from data dictionary,  otherwise we pass the input  manually. 
∙ Save the text. 
∙ Activate the text. 
∙ Back. 

Note:- 

If we are working with 'Begin of line & End of line' then the name of the  parameters will disappear, at that time we must provide comment before or after  the check box or radio button. 

Syntax of providing a comment:- 


Note:- 

Skip is the keyword to provide the space in between any two input  variables. 

Syntax:- 

Selection-screen skip <no>. 

∙ By default skip is one line, we can skip maximum 9 lines at a time. 


Types of Reports:- 

There are two types of reports. They are: 

1. Classical reports. 
2. Interactive reports. 

Classical reports:- 

A classical report is nothing but to display the entire information in to a single list.  


Interactive reports:- 

 An Interactive report is nothing but to display the summarized  information in the basic list & next level information in the secondary lists. 


Events in Classical reports:- 

Events in classical reports are 

1. Initialization. 
2. At selection-screen. 
3. At selection-screen on. 
4. Start-of-selection. 
5. Top-of-page. 
6. End-of-page. 
7. End-of-selection. 

Initialization:- 

 Initialization is an event which is triggered before displaying the  selection-screen. 

Advantage:- 

This is used to assign the default values to the selection-screen. 

At selection-screen:- 

 At selection-screen is an event which is triggered at after providing the input to the selection-screen & before leaving the selection-screen. 

Advantage:- 

This is used to validate the given input. 

At selection-screen on:- 

At selection-screen on is an event which is triggered at the selection-screen based on the given field. 

Advantage:- 

This is used to validate the given input. 

Start-of-selection:- 

 Start-of-selection is an event which is triggered after leaving  the selection-screen & before displaying   the output. 

Advantage:- 

This is used to retrieving the data from the database & placed in to  internal tables. 

Note:- 

Start-of-selection is a default event in the classical reports. 

Top-of-page:- 
 
Top-of-page is an event which is triggered at the Top of each page. 

Advantage:- 

This is used to display the header information. 

End-of-page:- 

 End-of-page is an event which is triggered at the End of each page. 

Advantage:- 

This is used to display the footer information.  

End-of-selection:- 

End-of-selection is an event which is triggered after manipulating the data. 

Advantage:- 

This is used to display the output. 

Order of the Events:- 


Initialization:- 

Initialization. 

S_BUKRS-low = '1000'. 
S_BUKRS-high = '2000'. 
S_BUKRS-sign = 'I'. 
S_BUKRS-option = 'BT'. 
Append S_BUKRS. 
S_BUKRS-low = '3000'. 
S_BUKRS-high = ''. 
S_BUKRS-sign = 'I'. 
S_BUKRS-option = 'EQ'. 
Append S_BUKRS. 

Message:- 

 We have five different types of messages. They are: 

1. ABEND (A). 
2. WARNING (W). 
3. ERROR (E). 
4. INFORMATION (I). 
5. SUCCESS (S). 

Abend Message:- (A) 

 The system displays a message of this message type in a dialogue window/box, after the user conform this message by using enter key, then  the system terminates entire transaction. 


∙ Message class is the collection of all the messages, their numbers. 

Note:- 

SE91 is the transaction code to create the message class. 

Steps to create Message class:- 

∙ Execute SE91. 
∙ Provide your message class. 
∙ Click on create. 
∙ Provide short description. 
∙ Click on save – local object.
∙ Click on messages-tab. 
∙ Provide the descriptions against numbers. 
∙ Click on save. 


Warning or Error messages:

The system displays a message of this message type in the status bar, after the user conform this message by using enter key then  the following things will be happened. 

1. If we are in the basic list then it goes to program. 
2. If we are in the secondary list then it goes to previous list. 


Information (I):- 

The system displays a message of this message type in a dialogue window/box, after the user conform this message by using enter key, then  it goes to selection-screen. 


Success (S):- 

 The system displays a message of this message type in a status bar. 


Generalized message syntax:- 


Differences between single select &select up to 1 rows:-  


Some of the database tables:- 
 
VBAK:- sales document header table. 

1. VBELN – Sales document number. 
2. VBTYP – Sales document entry. 
3. VKORG – Sales organization. 
4. KUNNR – Customer number. 
5. BUKRS – Company code. 
6. AUART – Sales document type. 

VBAP:- Sales document item table. 

1. VBELN – Sales document number, 
2. POSNR – item number. 
3. MATNR – Material number. 
4. ZMENG – quantity.
5. MEINS – UOM. 
6. NETWR – Net value. 

At selection-screen:- 
Validation:- 

E.g.: 1) - 
 
DATA V1 LIKE MARA-MATNR. 
AT SELECTION-SCREEN. 
SELECT MATNR FORM MARA INTO V1 UP TO 1 ROWS  WHERE MATNR IN S_MATNR. 
ENDSELECT. 

IF SY-SUBRC <> 0. 
MESSAGE E000(YSMSG) WITH ‗INVALID MATERIAL‘. 
ENDIF. 


At selection-screen on:- 

DATA V1 LIKE T001W-WERKS. 
AT SELECTION-SCREEN ON P_WERKS.
SELECT WERKS FORM T001W INTO V1 UP TO 1 ROWS  WHERE WERKS = P_WERKS. 
ENDSELECT. 
IF SY-SUBRC <> 0. 
MESSAGE E000(YSMSG) WITH ‗INVALID PLANT‘. 
ENDIF. 

Start-of-selection:- 

START-OF-SELECTION. 
SELECT BUKRS BUTXT ORT01 FROM T001 INTO TABLE  IT_T001 WHERE BUKRS IN S_BUKRS. 

Top-of-page:- 

TOP-OF-PAGE. 
WRITE 'SPRAO TECHNOLOGIES'.
 
End-of-page:-
 
END-OF-PAGE. 
WRITE 'THANK YOU'. 

End-of-selection:- 

END-OF-SELECTION. 
LOOP AT IT_T001 INTO WA_T001. 
WRITE: / WA_T001-BUKRS, WA_T001-BUTXT, WA_T001- ORT01. 
ENDLOOP. 

Note:- 
1. In the reports one event ends with another event. 
2. When ever we are working with END-OF-PAGE event then we must  provide 'line-count' in the name of the report. 

Syntax:- 

Line-count X(Y). 
X- Num of lines per page. 
Y- Num of lines for footer. 

Variant:- 

 Variant is used to save the selection-screen input. 

Steps to create a variant:- 

∙ Execute the program. 
∙ Provide the sample input.
∙ Click on save. 
∙ Provide the variant name & description. 
∙ Save. 

Note:- 

If you want to avoid the title in the displayed output then we must 'NO  STANDARD PAGE HEADING' in the name of the report. 

Object:- 

 Based on the given company codes to display the company codes,  company names, names & cities by using events, in the top always display  the 'welcome to sprao technologies' in the bottom to display 'thank you'. 

Program:- 

DATA V1 LIKE T001-BUKRS. 
SELECTION-SCREEN BEGIN OF BLOCK A WITH FRAME  TITLE TEXT-001. 
SELECT-OPTIONS S_BUKRS FOR V1. 
SELECTION-SCREEN END OF BLOCK A. 

DATA: BEGIN OF WA_T001, 
 BUKRS LIKE T001-BUKRS, 
 BUTXT LIKE T001-BUTXT, 
 ORT01 LIKE T001-ORT01, 
 END OF WA_T001. 

DATA IT_T001 LIKE TABLE OF WA_T001. 
AT SELECTION-SCREEN. 
SELECT BUKRS FROM T001 INTO V1 UP TO 1 ROWS WHERE  BUKRS IN S_BUKRS. 
ENDSELECT. 
IF SY-SUBRC <> 0. 
MESSAGE E000(YSMSG) WITH 'INVALID COMPANY'. 
ENDIF. 

START-OF-SELECTION. 
SELECT BUKRS BUTXT ORT01 FROM T001 INTO TABLE  IT_T001 WHERE BUKRS IN S_BUKRS. 

TOP-OF-PAGE. 
WRITE 'WELCOME TO SAP'.

END-OF-PAGE. 
WRITE 'THANK YOU'. 

END-OF-SELECTION. 
LOOP AT IT_T001 INTO WA_T001. 
WRITE :/ WA_T001-BUKRS, WA_T001-BUTXT, WA_T001- ORT01. 
ENDLOOP. 
  
Events in interactive reports:-
 
1. At line-selection. 
2. At user-command. 
3. Top-of-page during line-selection. 
4. At PF<N>. 
5. SET PF-STATUS. 

At line-selection:- 

At line-selection is an event which is triggered at the time of user clicks on any record of any list. 

At user-command:- 

 It is an event which is triggered at the time of user clicks on any menu item.  

Top-of-page during line-selection:- 

It is an event which is triggered at the top of each secondary list. 

At PF<N>:- 

It is an event which is triggered at the time of user clicks on any function keys (F1 to F12). 

Set PF-Status:- 

 It is an event which is used to attach the own GUI to the program. 

Some of the system variables related to interactive reports:- 

1. SY-LISEL. 
2. SY-LILLI. 
3. SY-UCOMM.
4. SY-LINNO. 
5. SY-LSIND. 

SY-LISEL:- 
It is the system variable which contains the contents of the selected  record. 

SY-LILLI:- 
It is the system variable which contains the exact line number of the  selected record by the user. 

SY-UCOMM:- 
It is the system variable which contains the function code of the  selected menu item. 

SY-LINNO:- 
It is the system variable which contains the line number of the last  record displayed. 

SY-LSIND:- 
It is the system variable which contains the current list index number. 

∙ Interactive reports supports the user interaction is always through double  click or F2. 
∙ When ever the user double clicks on any record of any list at line-selection event will be triggered &      list index will be incremented by one. 
∙ If you want to retrieve the data for this list we should know the record which  is clicked by the user in    the previous list. 

Hide:- 

Hide is the keyword which maintains the copy of the previous list with  output line numbers & their contents. When ever the user double clicks on any  record of any list at that time at line-selection event will be triggered & list index is  incremented by one & that particular record will be moving from hide area to work  area. 

Based on the work area we retrieve the data for the next list. 

Note:- 

Hide always maintain after the write statement.
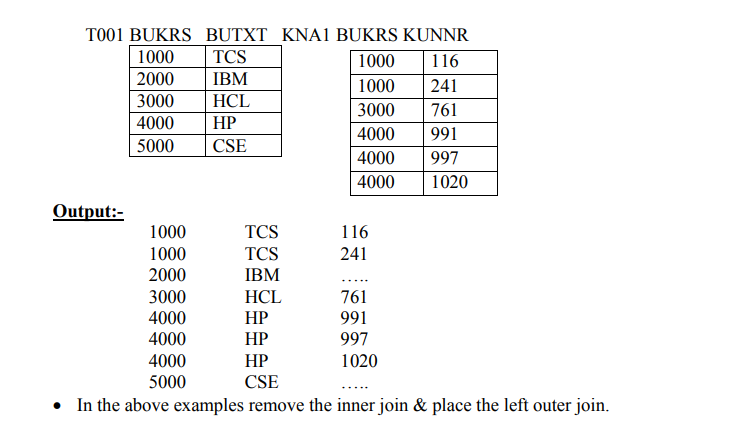

Object:-  


To display the company codes, company names & cities in the basic  list, when ever the user clicks on any record then we display the customer  under that company in the first secondary list. When ever the user clicks on  any record in the first secondary list then we display the customer list in the  second secondary list. 

Program:- 

DATA: BEGIN OF WA_T001, 

 BUKRS LIKE T001-BUKRS, 

 BUTXT LIKE T001-BUTXT, 

 ORT01 LIKE T001-ORT01, 

 END OF WA_T001. 

DATA IT_T001 LIKE TABLE OF WA_T001. 

DATA: BEGIN OF WA_KNB1, 

 BUKRS LIKE KNB1-BUKRS, 

 KUNNR LIKE KNB1-KUNNR, 

 AKONT LIKE KNB1-AKONT, 

 END OF WA_KNB1. 

DATA IT_KNA1 LIKE TABLE OF WA_KNA1. 

DATA: BEGIN OF WA_KNA1, 

 KUNNR LIKE KNA1-KUNNR, 

 NAME1 LIKE KNA1-NAME1, 

 ORT01 LIKE KNA1-ORT01, 

 END OF WA_KNA1. 

DATA IT_KNA1 LIKE TABLE OF WA_KNA1. 

SELECT BUKRS BUTXT ORT01 FROM T001 INTO TABLE  IT_T001. 

LOOP AT IT_T001 INTO WA_T001. 

WRITE: / WA_T001-BUKRS, WA_T001-BUTXT, WA_T001- ORT01. 

HIDE: WA_T001-BUKRS, WA_T001-BUTXT, WA_T001-ORT01. ENDLOOP. 

AT LINE-SELECTION. 

IF SY-LSIND = '1'.

SELECT BUKRS KUNNR AKONT FROM KNB1 INTO TABLE  IT_KNB1 WHERE BUKRS = 

WA_T001-BUKRS. 

LOOP AT IT_KNB1 INTO WA_KNB1. 

WRITE: / WA_KNB1-BUKRS, WA_KNB1-KUNNR, WA_KNB1- AKONT. 

HIDE: WA_KNB1-BUKRS, WA_KNB1-KUNNR, WA_KNB1- AKONT. 

ENDLOOP. 

ELSEIF SY-LSIND = '2'. 

SELECT KUNNR NAME1 ORT01 FROM KNA1 INTO TABLE  IT_KNA1 WHERE KUNNR = WA_KNB1-KUNNR. 

LOOP AT IT_KNA1 INTO WA_KNA1. 

WRITE: / WA_KNA1-KUNNR, WA_KNA1-NAME1, WA_KNA1- ORT01. 

ENDLOOP. 

ENDIF. 


Assignment:- 

To display the purchasing document numbers, document types,  vendor numbers in the basic list, when ever the user clicks on any record then we  display the item details (EBELN, EBELP, MENGE, MEINS & NETPR) in the first  secondary list. 

Program:- 

DATA: BEGIN OF WA_EKKO, 

 EBELN LIKE EKKO-EBELN, 

 BSART LIKE EKKO-BSART, 

 LIFNR LIKE EKKO-LIFNR,  

 END OF WA_EKKO. 

DATA IT_EKKO LIKE TABLE OF WA_EKKO. 

DATA: BEGIN OF WA_EKPO, 

 EBELN LIKE EKPO-EBELN, 

 EBELP LIKE EKPO-EBELP, 

 MENGE LIKE EKPO-MENGE, 

 MEINS LIKE EKPO-MEINS, 

 NETPR LIKE EKPO-NETPR, 

 END OF WA_EKPO.

DATA IT_EKPO LIKE TABLE OF WA_EKPO. 

SELECT EBELN BSART LIFNR FROM EKKO INTO TABLE  IT_EKKO. 

LOOP AT IT_EKKO INTO WA_EKKO. 

WRITE: / WA_EKKO-EBELN, WA_EKKO-BSART, WA_EKKO LIFNR. 

HIDE: / WA_EKKO-EBELN, WA_EKKO-BSART, WA_EKKO LIFNR. 

ENDLOOP. 

AT LINE-SELECTION. 

IF SY-LSIND = 1. 

SELECT EBELN EBELP MENGE MEINS NETPR INTO TABLE  IT_EKPO WHERE EBELN IN WA_EKKO-EBELN. 

LOOP AT IT_EKPO INTO WA_EKPO. 

WRITE: / WA_EKPO-EBELN, WA_EKPO-EBELP, WA_EKPO MENGE, WA_EKPO-MEINS, WA_EKPO-NETPR. 

ENDLOOP. 

ENDIF. 

Note:- 'CONVERSION_EXIT_ALPHA_INPUT' is the functional module which  is used to append zeros to the input variable based on the length of the input  variable. 

E.g.: 


DATA A (5) TYPE C. 

A=231. 

CONVERSION_EXIT_ALPHA_INPUT 

INPUT = A. 

OUTPUT = A. 

A 00231. 

Steps to call the function module:- 


Object:- 


Based on the given company codes to display the company codes, company  names & cities in the basic list, when ever the user clicks on any record then  we display the vendors under that company in the first secondary list. When  ever the user clicks on any record in the first secondary list then we display  the vendor details in the second secondary list by using 'SY-LISEL'. 


Program:- 

DATA V1 LIKE T001-BUKRS. 

SELECT-OPTIONS S_BUKRS FOR V1. 

DATA: BEGIN OF WA_T001, 

 BUKRS LIKE T001-BUKRS, 

 BUTXT LIKE T001-BUTXT, 

 ORT01 LIKE T001-ORT01, 

 END OF WA_T001. 

DATA IT_T001 LIKE TABLE OF WA_T001. 

DATA: BEGIN OF WA_LFB1, 

 LIFNR LIKE LFB1-LIFNR, 

 BUKRS LIKE LFB1-BUKRS, 

 AKONT LIKE LFB1-AKONT, 

 END OF WA_LFB1. 

DATA IT_LFB1 LIKE TABLE OF WA_LFB1. 

DATA: BEGIN OF WA_LFA1, 

 LIFNR LIKE LFA1-LIFNR, 

 NAME1 LIKE LFA1-NAME1, 

 ORT01 LIKE LFA1-ORT01, 

 END OF WA_LFA1. 

DATA IT_LFA1 LIKE TABLE OF WA_LFA1. 

SELECT BUKRS BUTXT ORT01 FROM T001 INTO TABLE  IT_T001 WHERE BUKRS IN S_BUKRS. 

LOOP AT IT_T001 INTO WA_T001. 

WRITE: / WA_T001-BUKRS, WA_T001-BUTXT, WA_T001- ORT01. 

ENDLOOP.

AT LINE-SELECTION. 

IF SY-LSIND = '1'. 

SELECT LIFNR BUKRS AKONT FROM LFB1 INTO TABLE  IT_LFB1 WHERE BUKRS =SY-LISEL+0(4). 

LOOP AT IT_LFB1 INTO WA_LFB1. 

WRITE: / WA_LFB1-LIFNR, WA_LFB1-BUKRS, WA_LFB1- AKONT. 

ENDLOOP. 

ELSEIF SY-LSIND = '2'. 

CALL FUNCTION 'CONVERSION_EXIT_ALPHA_INPUT'  EXPORTING 

 INPUT = SY-LISEL+5(10) 

IMPORTING 

 OUTPUT = SY-LISEL+5(10). 

SELECT LIFNR NAME1 ORT01 FROM LFA1 INTO TABLE  IT_LFA1 WHERE LIFNR = SY-LISEL+5(10). 

LOOP AT IT_LFA1 INTO WA_LFA1. 

WRITE: / WA_LFA1-LIFNR, WA_LFA1-NAME1, WA_LFA1- ORT01. 

ENDLOOP. 

ENDIF. 


In the above two techniques generates the next list based on the line selection, not based on field-selection. 

If you want to generate the next list based on the field selection then we go  for Get cursor technique. 

Syntax:- 

Get cursor field <variable 1> value <variable 2>. 

Note:- 

Get cursor technique returns the field name as well as field value which is  selected by the user.


Assignment:- 


Based on the given company codes to display the company codes,  company names, cities in the basic list, if the user clicks on company code then we  display the purchasing document header details in the first secondary list. If the  user clicks on any record then we display the item details (EBELN, EBELP,  MENGE, MEINS & NETPR) in the first secondary list by using get cursor  technique

Program:- 

DATA V1 LIKE T001-BUKRS. 

SELECT-OPTIONS S_BUKRS FOR V1. 

DATA: V2 (15), 

 V3 LIKE T001-BUKRS. 

DATA: BEGIN OF WA_T001, 

 BUKRS LIKE T001-BUKRS,/O SE38 

 BUTXT LIKE T001-BUTXT, 

 ORT01 LIKE T001-ORT01, 

 END OF WA_T001. 

DATA IT_T001 LIKE TABLE OF WA_T001. 

DATA: BEGIN OF WA_EKKO, 

 EBELN LIKE EKKO-EBELN, 

 BSART LIKE EKKO-BSART, 

 BUKRS LIKE EKKO-BUKRS, 

 END OF WA_EKKO. 

DATA IT_EKKO LIKE TABLE OF WA_EKKO. 

DATA: BEGIN OF WA_EKPO, 

 EBELN LIKE EKPO-EBELN, 

 EBELP LIKE EKPO-EBELP, 

 MENGE LIKE EKPO-MENGE, 

 MEINS LIKE EKPO-MEINS, 

 NETPR LIKE EKPO-NETPR, 

 END OF WA_EKPO. 

DATA IT_EKPO LIKE TABLE OF WA_EKPO. 

SELECT BUKRS BUTXT ORT01 FROM T001 INTO TABLE  IT_T001 WHERE BUKRS IN S_BUKRS. 

LOOP AT IT_T001 INTO WA_T001.

WRITE: / WA_T001-BUKRS, WA_T001-BUTXT, WA_T001- ORT01. 

ENDLOOP. 

AT LINE-SELECTION. 

IF SY-LSIND = '1'. 

GET CURSOR FIELD V2 VALUE V3. 

IF V2 = 'WA_T001-BUKRS'. 

CALL FUNCTION 'CONVERSION_EXIT_ALPHA_INPUT' EXPORTING 

INPUT = V3 

IMPORTING 

OUTPUT = V3. 

SELECT EBELN BSART BUKRS FROM EKKO INTO TABLE  IT_EKKO WHERE BUKRS = V3. 

LOOP AT IT_EKKO INTO WA_EKKO. 

WRITE: / WA_EKKO-EBELN, WA_EKKO-BSART, WA_EKKO BUKRS. 

ENDLOOP. 

ELSEIF SY-LSIND = 2. 

GET CURSOR FIELD V2 VALUE V3. 

ELSEIF V2 = 'WA_EKKO-EBELN'. 

CALL FUNCTION 'CONVERSION_EXIT_ALPHA_INPUT' EXPORTING 

INPUT = V3 

IMPORTING 

OUTPUT = V3. 

SELECT EBELN EBELP MENGE MEINS NETPR FROM EKPO  INTO TABLE IT_EKPO WHERE EBELN = V3. 

LOOP AT IT_EKPO INTO WA_EKPO. 

WRITE: / WA_EKPO-EBELN, WA_EKPO-EBELP, WA_EKPO MENGE, WA_EKPO-MEINS, 

WA_EKPO-NETPR. 

ENDLOOP. 

ENDIF. 

ENDIF. 

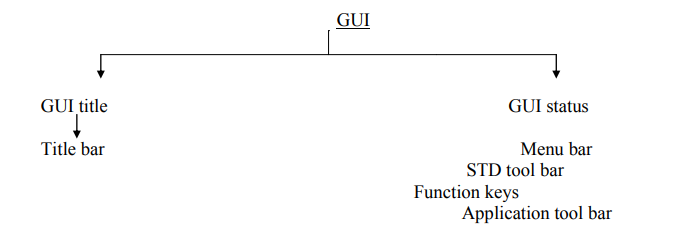
Working with GUI:- [menu painter]

Menu painter is a tool design the user interface to the program.

The transaction code for menu painter is SE41. 


Steps to design our own GUI to the program:-


Note:- 

1. We can design up to 6 menu items in the menu bar. 

2. System & help are the default menu items in the menu bar. 

3. We can design up to 35 push buttons in the application tool bar.

4. Set PF-status is the event which is used to attach the own GUI to the  program. 


Syntax:- 

Set PF-Status is the event which is used to attach the own GUI  to the program. 

∙ 'Download' is the function module which is used to download the data from  internal table to presentation server (C drive, D drive…). 

The input for the above function module is file type=‘DAT‘ & internal table.

E.g.: 

DATA V1 LIKE T001-BUKRS. 

SELECT-OPTIONS S_BUKRS FOR V1.

DATA: BEGIN OF WA_T001, 

 BUKRS LIKE T001-BUKRS, 

 BUTXT LIKE T001-BUTXT, 

 ORT01 LIKE T001-ORT01, 

 END OF WA_T001. 

DATA IT_T001 LIKE TABLE OF WA_T001. 

SELECT BUKRS BUTXT ORT01 FROM T001 INTO TABLE  IT_T001 WHERE BUKRS IN S_BUKRS. 

LOOP AT IT_T001 INTO WA_T001. 

WRITE: / WA_T001-BUKRS, WA_T001-BUTXT, WA_T001- ORT01. 

ENDLOOP. 

SET PF-STATUS 'STAT'. 

AT USER-COMMAND. 

IF SY-UCOMM = 'DOWN'. 

CALL FUNCTION 'DOWNLOAD' 

EXPORTING 

FILETYPE = 'DAT' 

TABLES 

DATA-TAB = IT_T001. 

ENDIF. 


For All Entries:-

Inner join pick the data based on the 'ON' condition first, next it  based on 'WHERE' condition. 

In the real time the maximum program execution tome in fore-ground is  '600sec'. 

More than two tables join, some times leads to timeout, so we go for 'FOR  ALL ENTRIES'. 

For all entries pick the data based on 'WHERE' condition first, next it based  on 'ON' condition. 

Object:- 

Based on the given company codes to display the company codes,  company names, customer numbers. 

Program:- 

DATA V1 LIKE T001-BUKRS.

SELECT-OPTIONS S_BUKRS FOR V1. 

DATA: BEGIN OF WA_T001, 

 BUKRS LIKE T001-BUKRS, 

 BUTXT LIKE T001-BUTXT, 

 END OF WA_T001. 

DATA IT_T001 LIKE TABLE OF WA_T001. 

DATA: BEGIN OF WA_KNB1, 

 BUKRS LIKE KNB1-BUKRS, 

 KUNNR LIKE KNB1-KUNNR, 

 END OF WA_KNB1. 

DATA IT_KNB1 LIKE TABLE OF WA_KNB1. 

DATA: BEGIN OF WA_FINAL, 

 BUKRS LIKE T001-BUKRS, 

 KUNNR LIKE KNB1-KUNNR, 

 BUTXT LIKE T001-BUTXT, 

 END OF WA_FINAL. 

DATA IT_FINAL LIKE TABLE OF WA_FINAL. 

SELECT BUKRS BUTXT FROM T001 INTO TABLE IT_T001  WHERE BUKRS IN S_BUKRS. 

IF NOT IT_T001 IS INITIAL. 

SELECT BUKRS KUNNR FROM KNB1 INTO TABLE IT_KNB1  FOR ALL ENTRIES IN 

IT_T001 WHERE BUKRS = IT_T001-BUKRS. 

ENDIF. 

LOOP AT IT_KNB1 INTO WA_KNB1. 

WA_FINAL-BUKRS = WA_KNB1-BUKRS. 

WA_FINAL-KUNNR = WA_KNB1-KUNNR. 

READ TABLE IT_T001 INTO WA_T001 WITH KEY BUKRS =  WA_KNB1-BUKRS. 

WA_FINAL-BUTXT = WA_T001-BUTXT.

APPEND WA_FINAL TO IT_FINAL. 

CLEAR: WA_FINAL, WA_T001, WA_KNB1. 

ENDLOOP. 

WRITE: 1(5)'BUKRS', 7(28)'BUTXT', 25(5)'KUNNR'. 

SKIP. 

LOOP AT IT_FINAL INTO WA_FINAL. 

WRITE: / WA_FINAL-BUKRS, WA_FINAL-BUTXT, WA_FINAL KUNNR. 

ENDLOOP. 

Object:- 

Based on the given purchasing document number to display the  document number, document type, vendor number, item number & price. 

Program:- 

DATA V1 LIKE EKKO-EBELN. 

SELECT-OPTIONS S_EBELN FOR V1. 

DATA: BEGIN OF WA_EKKO, 

 EBELN LIKE EKKO-EBELN, 

 BSART LIKE EKKO-BSART, 

 LIFNR LIKE EKKO-LIFNR, 

 END OF WA_EKKO. 

DATA IT_EKKO LIKE TABLE OF WA_EKKO. 

DATA: BEGIN OF WA_LFA1, 

 LIFNR LIKE LFA1-LIFNR, 

 NAME1 LIKE LFA1-NAME1, 

 END OF WA_LFA1. 

DATA IT_LFA1 LIKE TABLE OF WA_LFA1. 

DATA: BEGIN OF WA_EKPO, 

 EBELN LIKE EKPO-EBELN, 

 EBELP LIKE EKPO-EBELP, 

 NETPR LIKE EKPO-NETPR, 

 END OF WA_EKPO. 

DATA IT_EKPO LIKE TABLE OF WA_EKPO. 

DATA: BEGIN OF WA_FINAL,

 EBELN LIKE EKKO-EBELN, 

 BSART LIKE EKKO-BSART, 

 LIFNR LIKE LFA1-LIFNR, 

 NAME1 LIKE LFA1-NAME1, 

 EBELP LIKE EKPO-EBELP, 

 NETPR LIKE EKPO-NETPR, 

 END OF WA_FINAL. 

DATA IT_FINAL LIKE TABLE OF WA_FINAL. 

SELECT EBELN BSART LIFNR FROM EKKO INTO TABLE  IT_EKKO WHERE EBELN IN S_EBELN. 

IF NOT IT_EKKO IS INITIAL. 

SELECT LIFNR NAME1 FROM LFA1 INTO TABLE IT_LFA1  FOR ALL ENTRIES IN 

IT_EKKO WHERE LIFNR = IT_EKKO-LIFNR. 

SELECT EBELN EBELP NETPR FROM EKPO INTO TABLE  IT_EKPO FOR ALL ENTRIES IN 

IT_EKKO WHERE EBELN = IT_EKKO-EBELN. 

ENDIF. 

LOOP AT IT_EKPO INTO WA_EKPO. 

WA_FINAL-EBELN = WA_EKPO-EBELN. 

WA_FINAL-EBELP = WA_EKPO-EBELP. 

WA_FINAL-NETPR = WA_EKPO-NETPR. 

READ TABLE IT_EKKO INTO WA_EKKO WITH KEY EBELN =  WA_EKPO-EBELN. 

WA_FINAL-BSART = WA_EKKO-BSART. 

WA_FINAL-LIFNR = WA_EKKO-LIFNR. 

READ TABLE IT_LFA1 INTO WA_LFA1 WITH KEY LIFNR =  WA_EKKO-LIFNR. 

WA_FINAL-LIFNR = WA_LFA1-LIFNR. 

WA_FINAL-NAME1 = WA_LFA1-NAME1. 

APPEND WA_FINAL TO IT_FINAL. 

CLEAR: WA_FINAL, WA_EKKO, WA_EKPO, WA_LFA1. ENDLOOP.

LOOP AT IT_FINAL INTO WA_FINAL. 

WRITE: / WA_FINAL-EBELN, WA_FINAL-BSART, WA_FINAL LIFNR, WA_FINAL-NAME1, 

WA_FINAL-EBELP, WA_FINAL-NETPR. 

ENDLOOP. 

Object:-

Based on the given sales document number to display the sales  document number, document type, customer number, customer name, item  number, material number, material description & net value. 

Program:- 

INCLUDE YSAI_INCLUDE1. 

DATA: BEGIN OF WA_VBAK, 

 VBELN LIKE VBAK-VBELN, 

 AUART LIKE VBAK-AUART, 

 KUNNR LIKE VBAK-KUNNR, 

 END OF WA_VBAK. 

DATA IT_VBAK LIKE TABLE OF WA_VBAK. 

DATA: BEGIN OF WA_KNA1, 

 KUNNR LIKE KNA1-KUNNR, 

 NAME1 LIKE KNA1-NAME1, 

 END OF WA_KNA1. 

DATA IT_KNA1 LIKE TABLE OF WA_KNA1. 

DATA: BEGIN OF WA_VBAP, 

 VBELN LIKE VBAP-VBELN, 

 POSNR LIKE VBAP-POSNR, 

 NETWR LIKE VBAP-NETWR, 

 MATNR LIKE VBAP-MATNR, 

 END OF WA_VBAP. 

DATA IT_VBAP LIKE TABLE OF WA_VBAP. 

DATA: BEGIN OF WA_MAKT, 

 MATNR LIKE MAKT-MATNR, 

 MAKTX LIKE MAKT-MAKTX, 

 END OF WA_MAKT. 

DATA IT_MAKT LIKE TABLE OF WA_MAKT.

DATA: BEGIN OF WA_FINAL, 

 VBELN LIKE VBAK-VBELN, 

 AUART LIKE VBAK-AUART, 

 KUNNR LIKE KNA1-KUNNR, 

 NAME1 LIKE KNA1-NAME1, 

 POSNR LIKE VBAP-POSNR, 

 NETWR LIKE VBAP-NETWR, 

 MATNR LIKE MAKT-MATNR, 

 MAKTX LIKE MAKT-MAKTX, 

 END OF WA_FINAL. 

DATA IT_FINAL LIKE TABLE OF WA_FINAL. 

……………………………………………………. 

DATA V1 LIKE VBAK-VBELN. 

SELECT-OPTIONS S_VBELN FOR V1. 

INCLUDE YSAI_INCLUDE1. 

SELECT VBELN AUART KUNNR FROM VBAK INTO TABLE  IT_VBAK WHERE VBELN IN S_VBELN. 

IF NOT IT_VBAK IS INITIAL. 

SELECT KUNNR NAME1 FROM KNA1 INTO TABLE IT_KNA1  FOR ALL ENTRIES IN 

IT_VBAK WHERE KUNNR = IT_VBAK-KUNNR. 

SELECT VBELN POSNR NETWR MATNR FROM VBAP INTO  TABLE IT_VBAP 

FOR ALL ENTRIES IN IT_VBAK WHERE VBELN = IT_VBAK VBELN. 

ENDIF. 

IF NOT IT_VBAP IS INITIAL. 

SELECT MATNR MAKTX FROM MAKT INTO TABLE  IT_MAKT FOR ALL ENTRIES IN 

IT_VBAP WHERE MATNR = IT_VBAP-MATNR. ENDIF. 

LOOP AT IT_VBAP INTO WA_VBAP.

WA_FINAL-VBELN = WA_VBAP-VBELN. 

WA_FINAL-POSNR = WA_VBAP-POSNR. 

WA_FINAL-NETWR = WA_VBAP-NETWR. 

WA_FINAL-MATNR = WA_VBAP-MATNR. 

READ TABLE IT_VBAK INTO WA_VBAK WITH KEY VBELN =  WA_VBAK-VBELN. 

WA_FINAL-VBELN = WA_VBAK-VBELN. 

WA_FINAL-AUART = WA_VBAK-AUART. 

WA_FINAL-KUNNR = WA_VBAK-KUNNR. 

READ TABLE IT_KNA1 INTO WA_KNA1 WITH KEY KUNNR =  WA_VBAK-KUNNR. 

WA_FINAL-KUNNR = WA_KNA1-KUNNR. 

WA_FINAL-NAME1 = WA_KNA1-NAME1. 

READ TABLE IT_MAKT INTO WA_MAKT WITH KEY MATNR  = WA_VBAP-MATNR. 

WA_FINAL-MATNR = WA_MAKT-MATNR. 

WA_FINAL-MAKTX = WA_MAKT-MAKTX. 

APPEND WA_FINAL TO IT_FINAL. 

CLEAR: WA_VBAK, WA_VBAP, WA_KNA1, WA_MAKT,  WA_FINAL. 

ENDLOOP. 

LOOP AT IT_FINAL INTO WA_FINAL. 

WRITE: / WA_FINAL-VBELN, WA_FINAL-AUART, WA_FINAL KUNNR, WA_FINAL-NAME1, WA_FINAL-POSNR, WA_FINAL NETWR, WA_FINAL-MATNR, WA_FINAL-MAKTX. 

ENDLOOP. 

Object:- 

Based on the given materials to display the material number, material  type, plant number, plant name & material description by using FOR ALL  ENTRIES

Program:- 

DATA: BEGIN OF WA_MARA, 

 MATNR LIKE MARA-MATNR, 

 MTART LIKE MARA-MTART, 

 END OF WA_MARA. 

DATA IT_MARA LIKE TABLE OF WA_MARA. 

DATA: BEGIN OF WA_MARC,

 MATNR LIKE MARC-MATNR, 

 WERKS LIKE MARC-WERKS, 

 END OF WA_MARC. 

DATA IT_MARC LIKE TABLE OF WA_MARC. 

DATA: BEGIN OF WA_T001W, 

 WERKS LIKE T001W-WERKS, 

 NAME1 LIKE T001W-NAME1, 

 END OF WA_T001W. 

DATA IT_T001W LIKE TABLE OF WA_T001W. 

DATA: BEGIN OF WA_MAKT, 

 MATNR LIKE MAKT-MATNR, 

 MAKTX LIKE MAKT-MAKTX, 

 END OF WA_MAKT. 

DATA IT_MAKT LIKE TABLE OF WA_MAKT. 

DATA: BEGIN OF WA_FINAL, 

 MATNR LIKE MARA-MATNR, 

 MTART LIKE MARA-MTART, 

 WERKS LIKE MARC-WERKS, 

 NAME1 LIKE T001W-NAME1, 

 MAKTX LIKE MAKT-MAKTX, 

 END OF WA_FINAL. 

DATA IT_FINAL LIKE TABLE OF WA_FINAL. 

………………………………………………….. 

DATA V1 LIKE MARA-MATNR. 

SELECT-OPTIONS S_MATNR FOR V1. 

INCLUDE YSAI_INCLUDE2_1. 

SELECT MATNR MTART FROM MARA INTO TABLE  IT_MARA WHERE MATNR IN S_MATNR. 

IF NOT IT_MARA IS INITIAL. 

SELECT MATNR WERKS FROM MARC INTO TABLE IT_MARC  FOR ALL ENTRIES IN 

IT_MARA WHERE MATNR = IT_MARA-MATNR.

SELECT WERKS NAME1 FROM T001W INTO TABLE IT_T001W  FOR ALL ENTRIES IN 

IT_MARC WHERE WERKS = IT_MARC-WERKS. 

SELECT MATNR MAKTX FROM MAKT INTO TABLE  

IT_MAKT FOR ALL ENTRIES IN 

IT_MARC WHERE MATNR = IT_MARC-MATNR. 

ENDIF. 

LOOP AT IT_MARC INTO WA_MARC. 

WA_FINAL-MATNR = WA_MARC-MATNR. 

WA_FINAL-WERKS = WA_MARC-WERKS. 

READ TABLE IT_MARA INTO WA_MARA WITH KEY MATNR  = WA_MARC-MATNR. 

WA_FINAL-MTART = WA_MARA-MTART. 

READ TABLE IT_T001W INTO WA_T001W WITH KEY WERKS  = WA_T001W-WERKS. 

WA_FINAL-NAME1 = WA_T001W-NAME1. 

READ TABLE IT_MAKT INTO WA_MAKT WITH KEY MATNR  = WA_MARC-MATNR. 

WA_FINAL-MAKTX = WA_MAKT-MAKTX. 

APPEND WA_FINAL TO IT_FINAL. 

ENDLOOP. 

LOOP AT IT_FINAL INTO WA_FINAL. 

WRITE: / WA_FINAL-MATNR, ‗‘, WA_FINAL-MTART, ‗‘,  WA_FINAL-WERKS, ‗‘, WA_FINAL-NAME1, ‗‘, WA_FINAL MAKTX. 

ENDLOOP. 

Modularization techniques:- 

Modularization techniques are used to divide the business processing logic in to reusable block of statements. 

Modularization techniques are two step procedure 


1. Defining the reusable block. 

2. Calling the reusable block. 

There are two types of modularizing techniques. They are:


Include:- 


 We cannot execute an include program independently, where as the  same include program can be included in any number of executable program. 

Advantage:- 

This is used to improve the readability of the program. 

Note:- 

In the real time we use include programs for declarations. 

Steps to create/define the include program:- 

Execute SE38. 

Provide your include program name. 

Click on create. 

Provide title. 

Provide type as – include. 

Save – local object. 


E.g.: 

DATA: BEGIN OF WA_T001, 

 BUKRS LIKE T001-BUKRS, 

 BUTXT LIKE T001-BUTXT, 

 END OF WA_T001. 

DATA IT_T001 LIKE TABLE OF WA_T001. 


Save. 

Check. 

Activate. 

Syntax of calling the include program in any executable program:- 

Include <include name>. 

E.g.: 

Include YSAI_INCLUDE. 

SELECT BUKRS BUTXT ORT01 FROM T001 INTO TABLE  IT_T001.

LOOP AT IT_T001 INTO WA_T001. 

WRITE: / WA_T001-BUKRS, WA_T001-BUTXT, WA_T001- ORT01. 

ENDLOOP. 


Macros:-  If you want to access the block of statements more than once in a  program, then we place those statements in the definition of the macro. 


Macros are used to perform the arithmetical operations. 

Macros can take up to 9 place holders. (&1, &2……. &9).  

Syntax of defining the Macro:- 

Note:- 

In the macros, definition should be the first & the calling should be the next. 

E.g.: 


1. DATA RESULT TYPE I. 

DEFINE ZADD SUBROUTINE. 

RESULT = &1 + &2. 

END-OF-DEFINITION. 

ADD 5 20. 

WRITE RESULT. 

2. DATA RESULT TYPE I. 

DEFINE ZCAL. 

RESULT = &1 &2 &3. 

END-OF-DEFINITION. 

ZCAL 15 * 10. 

WRITE RESULT.

ZCAL 15 + 10. 

WRITE RESULT. 

Multiple records using macros:- 

DATA: BEGIN OF EMP, 

 EID (10) TYPE C, 

 ENAME (25) TYPE C, 

 EADD (35) TYPE C, 

 END OF EMP. 

DATA EMP1 LIKE TABLE OF EMP. 

DEFINE FILL. 

EMP-EID = &1. 

EMP-ENAME = &2. 

EMP-EADD = &3. 

APPEND EMP TO EMP1. 

END-OF-DEFINITION. 

FILL '1' 'SPRAO' 'SANATH NAGAR'. 

FILL '2' 'RAJ' 'BEGUMPET'. 

FILL '1' 'SANDEEP' 'BEGUMPET'. 

LOOP AT EMP1 INTO EMP. 

WRITE: / EMP-EID, EMP-ENAME, EMP-EADD. 

ENDLOOP. 

Note:- 

We cannot nest the definition of the macro (with in a macro we can‘t write  another macro). 

In the real time macros are used in HR ABAP (HR ABAP use INFOTYPE). 
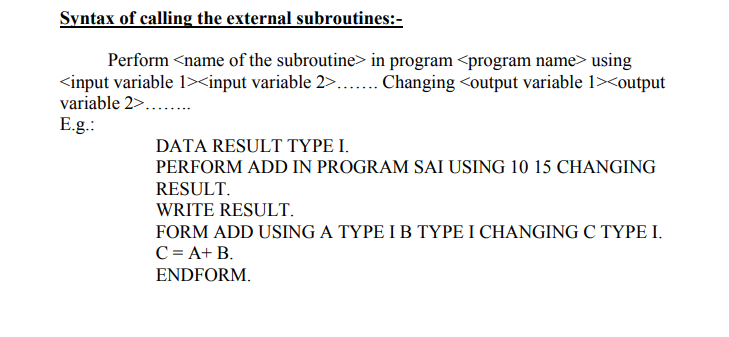
Sub-Routine:-

Sub-routines are procedures that can be defined in any ABAP program and call from the same/other ABAP program.

Syntax of defining the Subroutine:-


Note:- 1. In the subroutine calling should be the first & definition should be the next. 2. We cannot place any executable statement after the definition of the subroutine.

DATA RESULT TYPE I. PARAMTER: P_INPUT1 TYPE I, P_INPUT2 TYPE I. PERFORM ADD USING P_INPUT1 P_INPUT2 CHANGING RESULT. WRITE RESULT. FORM ADD USING A TYPE I B TYPE I CHANGING C TYPE I. C = A + B. ENDFORM.

E.g.:

DATA: BEGIN OF WA_T001, BUKRS LIKE T001-BUKRS, BUTXT LIKE T001-BUTXT, END OF WA_T001. DATA IT_T001 LIKE TABLE OF WA_T001. SELECT BUKRS BUTXT ORT01 FROM T001 INTO TABLE IT_T001. PERFORM READ-DATA USING IT_T001 4 CHANGING WA_T001. WRITE: / WA_T001-BUKRS, WA_T001-BUTXT, WA_T001- ORT01. FORM READ-DATA USING A LIKE IT_T001 B TYPE I CHANGING C LIKE WA_T001. READ TABLE A INTO C INDEX B. ENDFORM.

Note:- There are two types of Subroutines. They are:

1. Internal subroutines. 2. External subroutines.

  • Internal subroutine is nothing but the definition of subroutine as well as the calling of subroutine in the same program.

  • External subroutine is nothing but the definition of subroutine in one program & the calling of subroutine in another program.

Termination of the subroutine:-

Subroutine normally ends with 'ENDFORM' if we want to terminate the subroutine earlier then we use EXIT or CHECK commands.

  • EXIT is used to terminate the subroutine unconditionall.
  • CHECK is used to terminate the subroutine conditionally.

E.g.:

DATA R TYPE I. PERFORM ZDIV USING P_INPUT1 P_INPUT2 CHANGING R. WRITE R. FORM ZDIV USING A TYPE I B TYPE I COMING C TYPE I. CHECK B <> 0. C = A + B. ENDFORM.

Differences between Macros & Subroutines:-

Global data:-

Subroutines can access the global declarations in which they are defined. When ever the changes occurred in the subroutine those changes will be reflected to global declarations.

Note:-

LOCAL is the keyword to avoid the changes in subroutines.

E.g.:

TABLES T001. T001-BUKRS = ‗1000‘. T001-BUTXT = ‗TCS‘. T001-ORT01 = ‗HYD‘. PERFORM ZGLOBAL. WRITE: / T001-BUKRS, T001-BUTXT, T001-ORT01. FORM ZGLOBAL. LOCAL T001. T001-BUKRS = ‗2000‘. T001-BUTXT = ‗IBM‘. T001-ORT01 = ‗MUM‘. WRITE: / T001-BUKRS, T001-BUTXT, T001-ORT01. ENDFORM.

Function module:-

Function modules are reusable components that are defined in functional library.

  • Each Function module must be attached with one Function group which contains two include programs by default, one is for common subroutines, and another one is for global declarations.

  • All the function modules under that function group can access the both the include programs.
  • When ever we are calling the any function module then all the function modules under that group will be loaded n to the memory of the calling program, so that it‘s better to group the related function modules in to one function group.


Note:-
We can test the function module independently without calling the function module.
Steps to create Function group:-

  • Execute SE37.
  • In the menu bar – goto – function groups – create group.
  • Provide your function group name.
  • Provide short description.
  • Save – local object.

Steps to activate the function group:-

  • Execute SE37.
  • In the menu bar – environment – inactive objects.
  • Expand your function group.
  • Select your function group.
  • Click on activate (in ECC 6.0 – select function group – right click – activate).

Components of the function module:-

1. Attributes. 
2. Import. 
3. Export. 
4. Changing. 
5. Tables.
6. Exception. 
7. Source code.

1.Attributes:- Attributes specify the type of the function module, normal or remote. We can access the normal function module with in the server only, where as we can access remote function modules with in the server as well as outside the server also.

2. Import acts like using in the subroutine.

3. Export acts like changing the subroutine.

4. Changing acts like both import & export.

5. Tables acts like both import & export only for internal tables.

6. Exception use to handle the errors.

7. Source code – the logic related to function module.

Differences between function module & subroutine:-


Steps to create function module:- 
  •  Execute SE37. 
  •  Provide your function module name. 
  •  Create. 
  •  Provide function group name & short description. 
  • Save. 
Note:- Function modules return single values, multiple single values so that we no need to write any display statement. 

Object:- Develop a function module to calculate the addition of two numbers.

Program:-

IMPORT.
A TYPE I.
B TYPE I.

EXPORT.
C TYPE I.

SOURCE CODE.
C = A+ B.

Object:-
 To develop the function module, to display the customers under given company code.

Program:-

IMPORT.
P_BUKRS LIKE T001-BUKRS.
TABLES.
IT LIKE KNB1.
SOURCE CODE.
SELECT * FROM KNB1 INTO TABLE IT WHER BUKRS =P_BUKRS.

Object:- 

 To develop the function module, to display the material details, based on the given material number.

Program:-

IMPORT.
P_MATNR LIKE MARA-MATNR.
EXPORT.
WA LIKE MARA.
EXCEPTIONS.
NO_DATA.
SOURCE CODE.
SELECT SINGLE * FROM MARA INTO TABLE WA WHER
MATNR = P_ MATNR.
IF SY-SUBRC <> 0.
RAISE NO_DATA.
ENDIF.


ALV (ABAP LIST VIEWER):-

ALV is used to display the output with predefined functionalities such as

1. Sort the list in ascending order
2. Sort the list in descending order
3. Filtering
4. Down the list
5. Change the layout
6. Send as attachment
7. Word processing
8. Excel sheet
9. Graphics

STEPS TO WORK WITH ALV:

1. Declare the final internal table and fill the data in internal table (the data we want display)
2. Prepare the field catalogue internal table (about the fields) i.e. .column position, column
heading, hotspot, emphasize, edit.
3. Call the REUSE_ALV_LIST__DISPLAY or REUSE_ALV_GRID_DISPLAY function
module.

REUSE_ALV_GRID_DISPLAY:

It is function module which displays output in grid format.

REUSE_ALV_LIST_DISPLAY:

It is function module which used to display in list format.
The input for the above two function module is two internal tables
1. DATA INTERNAL TABLE
2. FIELD CATALOGUE INTERNAL TABLE

Program: to view the all data in the table.

DATA: IT_T001 LIKE TABLE OF T001.
SELECT * FROM T001 INTO TABLE IT_T001.

CALL FUNCTION ‘REUSE_ALV_GRID_DISPLAY’
EXPORTING
 I_STRUCTURE_NAME = ‘T001’
TABLES
T_OUTTAB = IT_T001.

NOTE:

Whenever we working with all the fields form any one of the database table at that time
we no need to prepare field catalogue we simply pass I_STRUCTURE _NAME as Database
table name.
In this scenario function module picks the column headings from the data element of each
field and display fields in the similar order of the fields in the table.

PREPARE THE FIELD CATALOGUE:

Methode1: Whenever working with all the fields from any one of the database tables then we no
need prepare field catalogue we simply pass I_STRUCTURE_NAME as database table name.
Methode2: Manually filling field catalogue.
Metohde3: By using REUSE_ALV_FIELDCATALOG_MERGE function module.

REUSE_ALV_FIELDCATALOG_MERGE:

It is the function module which is used to prepare the field catalogue the input for the
above function module is data work area. If we are working with internal table with header line
then we pass internal table name
The output for the above function module is field catalogue internal table.
Some of the fields in Field Catalogue Internal Table:


NOTE:

In SLIS we have one type that is SLIS_T_FIELDCAT_ALV which contains the entire
fields related to field catalogue. So we simply declare field catalogue internal table by referring
SLIS_T_FIELDCAT_ALV.

NOTE:
SLIS is the type group which contains all the types related to ALV.

STEPS TO CREATE TYPE GROUP:

  • Execute SE80 (In ECC 6.0. SE 11).
  • Edit object in application toolbar.
  • Click on dictionary table.
  • Select the radio button TYPE GROUP.
  • Provide your Type Group Name, Click on Create.
  • Provide short text.
  • SAVE
PROGRAM:

TYPE-POOL YSPRAO.
TYPES: BEGIN OF YSPRAO-T001,
BUKRS LIKE T001-BUKRS,
BUTXT LIKE T001-BUTXT,
ORT01 LIKE T001-ORT01,
END OF YSPRAO-T001.

SAVE, CHECK, ACTIVATE

NOTE: Whenever we are referring any type under any type group then we must include type
group name in the report (not in the report name).

Type-pools:
It is the key word which is used to include the any type group.

PROGRAM:

DATA WA_T001 TYPE YSPRRAO-T001.
DATA IT_T001 LIKE TABLE OF WA_T001.
SELECT BUKRS BUTXT ORT01 FROM T001 INTO TABLE IT_T001.
LOOP AT IT_T001 INTO WA_T001.
WRITE: / WA_T001-BUKRS, WA_T001-BUTXT, WA_T001-ORT01.
ENDLOOP.


OBJECT:

To display the purchasing document numbers, document type, vendor number by using
ALV.

REPORT YRAKESH_ALV_FCATMANUAL .

TYPE-POOLS SLIS.

*** DECLARE IT.

DATA : BEGIN OF WA_EKKO,
 EBELN LIKE EKKO-EBELN,
 BSART LIKE EKKO-BSART,
 LIFNR LIKE EKKO-LIFNR,
 END OF WA_EKKO.

DATA IT_EKKO LIKE TABLE OF WA_EKKO.

***FILL IT.

SELECT EBELN BSART LIFNR FROM EKKO INTO TABLE IT_EKKO.

*** DECLARE FIELDCATLOG.

DATA : IT_FCAT TYPE SLIS_T_FIELDCAT_ALV,
 WA_FCAT LIKE LINE OF IT_FCAT.

*** FILLING THE FIELD CATALOG INT TABLE.

WA_FCAT-FIELDNAME = 'EBELN'.
WA_FCAT-COL_POS = '1'.
WA_FCAT-SELTEXT_M ='PUR.DOC'.

WA_FCAT-HOTSPOT = 'X'.
APPEND WA_FCAT TO IT_FCAT.
CLEAR WA_FCAT.

WA_FCAT-FIELDNAME = 'BSART'.
WA_FCAT-COL_POS = '2'.
WA_FCAT-SELTEXT_M ='DOC.TYPE'.
WA_FCAT-EMPHASIZE = 'C110'.
APPEND WA_FCAT TO IT_FCAT.
CLEAR WA_FCAT.

WA_FCAT-FIELDNAME = 'LIFNR'.
WA_FCAT-COL_POS = '3'.
WA_FCAT-SELTEXT_M ='VENDOR'.
WA_FCAT-EDIT = 'X'.
WA_FCAT-NO_OUT = 'X'.

APPEND WA_FCAT TO IT_FCAT.
CLEAR WA_FCAT.

***DISPLAY OUTPUT.

CALL FUNCTION 'REUSE_ALV_GRID_DISPLAY'
EXPORTING
* IS_LAYOUT =
 IT_FIELDCAT = IT_FCAT
 TABLES
 T_OUTTAB = IT_EKKO.


OBJECT:

To display customer numbers, names and cities by using REUSE_ALV_FIELDCATLOG_MERGE in ALV.

REPORT YRAKESH_ALV_FCAT_FM .

TYPE-POOLS SLIS.

*** DECLARING IT

DATA: BEGIN OF WA_KNA1,
 KUNNR LIKE KNA1-KUNNR,
 NAME1 LIKE KNA1-NAME1,
 ORT01 LIKE KNA1-ORT01,
 END OF WA_KNA1.
DATA IT_KNA1 LIKE TABLE OF WA_KNA1.

***FILLING IT

SELECT KUNNR NAME1 ORT01 FROM KNA1 INTO TABLE IT_KNA1.

*** DECALRING FILE CAT IT

DATA IT_FCAT TYPE SLIS_T_FIELDCAT_ALV.

***FILLING FIELD CATLOG

CALL FUNCTION 'REUSE_ALV_FIELDCATALOG_MERGE'
EXPORTING
 I_PROGRAM_NAME = SY-CPROG
 I_INTERNAL_TABNAME = 'WA_KNA1'
 I_INCLNAME = SY-CPROG
 CHANGING
 CT_FIELDCAT = IT_FCAT.

***DISPLAY THE DATA

CALL FUNCTION 'REUSE_ALV_GRID_DISPLAY'
EXPORTING
 I_CALLBACK_PROGRAM = SY-CPROG
 IT_FIELDCAT = IT_FCAT
 TABLES
 T_OUTTAB = IT_KNA1.


WORKING WITH EVENTS:

In ALV events are handled through SUB ROUTINES only whenever we working with
events then we must declare an internal table which contains two fields i.e. Event Name(NAME)
which form handle that event (FORM) .

NOTE:

In SLIS we have one type that is SLIS_T_EVENT which contains the above two fields
so that we simply declare our Event Internal Table by referring SLIS_T_EVENT.

REUSE_ALV_COMMENTARY_WRITE is the function module which is used to
display the text or comment in the TOP_OF_ PAGE or END_ OF_ LIST events. The input for
the above function module is an internal table which contains two fields that is
1. What to display (INFO)
2. How to display (TYP).

In SLIS we have one type that is SLIS_T_LISTHEADER which contains the above two
fields so that we simply declare the above two fields, so that simply declare internal tables by
referring SLIS_T_LISTHEADER.

STEPS TO UPLOAD LOGO IN ALV:

  •  Execute OAER.
  •  Provide CLASS NAME : Pictures
  • CLASS TYPE: OT
  • OBJECT KEY: YSPRAO (Any Name)
  • Execute or F8.
  • In Bottom Window
  • Expand Standard.Doc.Type
  • Double Click on SCREEN
  • Provide your Logo path
  • Enter
NOTE:

Whenever we are working with Events then we must pass I_CALLBACK_PROGRAM
as current program name in the Grid Display.

PROGRAM:

*&-----------------------------------------------------------*
*& Program to print TOP_OF_PAGE and END_OF_LIST Events *
*------------------------------------------------------------*

REPORT YRAKESH_ALV_EVENTS .

TYPE-POOLS SLIS.

*** DECLARING IT

DATA :BEGIN OF WA_FINAL,
 BUKRS LIKE T001-BUKRS,
 BUTXT LIKE T001-BUTXT,
 KUNNR LIKE KNB1-KUNNR,
 AKONT LIKE KNB1-AKONT,
 END OF WA_FINAL.

DATA IT_FINAL LIKE TABLE OF WA_FINAL.

***FILLING IT

SELECT T001~BUKRS T001~BUTXT KNB1~KUNNR KNB1~AKONT INTO TABLE
IT_FINAL
FROM T001 INNER JOIN KNB1 ON T001~BUKRS = KNB1~BUKRS.

*** DECALRING FILE CAT IT

DATA IT_FCAT TYPE SLIS_T_FIELDCAT_ALV.

***FILLING FIELD CATLOG

CALL FUNCTION 'REUSE_ALV_FIELDCATALOG_MERGE'
EXPORTING
 I_PROGRAM_NAME = SY-CPROG
 I_INTERNAL_TABNAME = 'WA_FINAL'
 I_INCLNAME = SY-CPROG
 CHANGING
 CT_FIELDCAT = IT_FCAT.

***DECLARE EVENT IT
DATA : IT_EVENT TYPE SLIS_T_EVENT,
 WA_EVENT LIKE LINE OF IT_EVENT.

***FILLING THE EVENT IT

WA_EVENT-NAME = 'TOP_OF_PAGE'.
WA_EVENT-FORM = 'ZTOP'.
APPEND WA_EVENT TO IT_EVENT.
WA_EVENT-NAME = 'END_OF_LIST'.
WA_EVENT-FORM = 'ZEOL'.
APPEND WA_EVENT TO IT_EVENT.

***DISPLAY THE DATA

CALL FUNCTION 'REUSE_ALV_GRID_DISPLAY'
EXPORTING
 I_CALLBACK_PROGRAM = SY-CPROG
 IT_FIELDCAT = IT_FCAT
 IT_EVENTS = IT_EVENT
 TABLES
 T_OUTTAB = IT_FINAL.

**** DEFINING SUB ROUTINE

FORM ZTOP.

DATA : IT_LIST TYPE SLIS_T_LISTHEADER,
 WA_LIST LIKE LINE OF IT_LIST.
 WA_LIST-INFO = 'These r Customer under Company'.
 WA_LIST-TYP = 'S'. " H->header, S->selection, A->action
 APPEND WA_LIST TO IT_LIST.

CALL FUNCTION 'REUSE_ALV_COMMENTARY_WRITE'
 EXPORTING
 IT_LIST_COMMENTARY = IT_LIST
 I_LOGO ='YRAKESH'.
ENDFORM.
FORM ZEOL.
DATA : IT_LIST1 TYPE SLIS_T_LISTHEADER,
 WA_LIST1 LIKE LINE OF IT_LIST1.
 WA_LIST1-INFO = 'THAN Q'.
 WA_LIST1-TYP = 'A'.
 APPEND WA_LIST1 TO IT_LIST1.
 CALL FUNCTION 'REUSE_ALV_COMMENTARY_WRITE'
 EXPORTING
 IT_LIST_COMMENTARY = IT_LIST1
 I_END_OF_LIST_GRID = 'X'.
ENDFORM.

USER_COMMAND:

It is an event which acts like both AT LINE SELCTION as well as AT USER COMMAND in the ordinary reports. It is Event which is triggered at the time of user click on any record of any list as well as any menu item.

OBJECT:

Based on the given company codes to display the company code to display the company codes, company names and cities by using ALV, whenever user clicks on company code then We display the all the customers information under that company.

REPORT YRAKESH_ALV_IREP .

TYPE-POOLS SLIS.

DATA V1 LIKE T001-BUKRS.

SELECT-OPTIONS S_BUKRS FOR V1 .

***DECLARE IT_TOO1.

DATA : BEGIN OF WA_T001,
 BUKRS LIKE T001-BUKRS,
 BUTXT LIKE T001-BUTXT,
 ORT01 LIKE T001-ORT01,
 END OF WA_T001.

DATA IT_T001 LIKE TABLE OF WA_T001.

***DECLARE IT_KNB1.

DATA : BEGIN OF WA_KNB1,
 KUNNR LIKE KNB1-KUNNR,
 BUKRS LIKE KNB1-BUKRS,
 AKONT LIKE KNB1-AKONT,
 PERNR LIKE KNB1-PERNR,
 END OF WA_KNB1.

DATA IT_KNB1 LIKE TABLE OF WA_KNB1.

***FILLING IT_T001.

SELECT BUKRS BUTXT ORT01 FROM T001 INTO TABLE IT_T001 WHERE BUKRS
IN
S_BUKRS.

***DECLARE IT_FCAT.

DATA : IT_FCAT TYPE SLIS_T_FIELDCAT_ALV,
 WA_FCAT LIKE LINE OF IT_FCAT.

***FILLING FIELD CATALOG.

CALL FUNCTION 'REUSE_ALV_FIELDCATALOG_MERGE'
EXPORTING
 I_PROGRAM_NAME = SY-CPROG
 I_INTERNAL_TABNAME = 'WA_T001'
 I_INCLNAME = SY-CPROG
 CHANGING
 CT_FIELDCAT = IT_FCAT.

******************************************
***DECLARE IT_FCAT FOR SECOND LIST.

DATA : IT_FCAT1 TYPE SLIS_T_FIELDCAT_ALV,
 WA_FCAT1 LIKE LINE OF IT_FCAT1.

***FILLING FIELD CATALOG FOR SECONDLIST.

CALL FUNCTION 'REUSE_ALV_FIELDCATALOG_MERGE'
EXPORTING
 I_PROGRAM_NAME = SY-CPROG
 I_INTERNAL_TABNAME = 'WA_KNB1'
 I_INCLNAME = SY-CPROG
 CHANGING
 CT_FIELDCAT = IT_FCAT1.

***DECLARING IT_EVENT.

DATA : IT_EVENT TYPE SLIS_T_EVENT,
 WA_EVENT LIKE LINE OF IT_EVENT.

***FILLING IT_EVENT.

 WA_EVENT-NAME = 'TOP_OF_PAGE'.
 WA_EVENT-FORM = 'ZTOP'.
 APPEND WA_EVENT TO IT_EVENT.
 WA_EVENT-NAME = 'END_OF_LIST'.
 WA_EVENT-FORM = 'ZEOL'.
 APPEND WA_EVENT TO IT_EVENT.
 WA_EVENT-NAME = 'USER_COMMAND'.
 WA_EVENT-FORM = 'ZUC'.
 APPEND WA_EVENT TO IT_EVENT.

*** DISPLAY DATA

CALL FUNCTION 'REUSE_ALV_GRID_DISPLAY'
EXPORTING
 I_CALLBACK_PROGRAM = SY-CPROG
 IT_FIELDCAT = IT_FCAT
 IT_EVENTS = IT_EVENT
 TABLES
 T_OUTTAB = IT_T001.
 REFRESH IT_FCAT.

*** CALLING FORMS.

***DEF OF FORM ZTOP.

FORM ZTOP.

DATA : IT_LIST TYPE SLIS_T_LISTHEADER,
 WA_LIST LIKE LINE OF IT_LIST.
 WA_LIST-INFO = 'COMPANY DETAILS'.
 WA_LIST-TYP = 'S'.
 APPEND WA_LIST TO IT_LIST.
 CALL FUNCTION 'REUSE_ALV_COMMENTARY_WRITE'
 EXPORTING
 IT_LIST_COMMENTARY = IT_LIST
 I_LOGO = 'YRAKESH'.
ENDFORM.

***DEF OF FORM ZEOL.

FORM ZEOL.
DATA : IT_LIST1 TYPE SLIS_T_LISTHEADER,
 WA_LIST1 LIKE LINE OF IT_LIST1.
 WA_LIST1-INFO = 'THAN Q'.
 WA_LIST1-TYP = 'S'.
 APPEND WA_LIST1 TO IT_LIST1.
 CALL FUNCTION 'REUSE_ALV_COMMENTARY_WRITE'
 EXPORTING
 IT_LIST_COMMENTARY = IT_LIST1
 I_END_OF_LIST_GRID = 'X' .
ENDFORM.

*** DEF OF FORM ZUC.

FORM ZUC USING A LIKE SY-UCOMM B TYPE SLIS_SELFIELD.
IF B-FIELDNAME = 'BUKRS'.
SELECT KUNNR BUKRS AKONT PERNR FROM KNB1 INTO TABLE IT_KNB1 WHERE
BUKRS = B-VALUE.
CALL FUNCTION 'REUSE_ALV_GRID_DISPLAY'
EXPORTING
 IT_FIELDCAT = IT_FCAT1
 TABLES
 T_OUTTAB = IT_KNB1.
ENDIF.
ENDFORM. 


SOME OF THE IMPORTANT TRANSACTION CODES.

XD03 ------Display Customer
XK03 ------ Display Vendor
MM03 ----Display Material
ME23N --- Display Purchase Order.
VA03 ----- Display Sales Order
MB03 ---- Display Material Document
FB03 ----- Display Accounting Document.

SYNTAX OF CALLING TRANSACTION:

CALL TRANSACTION '<T-CODE>'.
E.g. Call Transaction 'XK03'.

SYNTAX OF SET THE VALUE TO THE TRANSACTION

SET PARAMETER ID '<ID Name>' FIELD <Value>.
E.g. SET Parameter ID 'LIF' Field 'P5602'.

STEPS TO IDENTIFY THE PARAMETER ID:

OBJECT:

Based on the given Purchasing document number to display Purchasing Document
number, Document type, Vendor Number, Item Number and Quantity by using ALV. If user
clicks on any Purchasing Document Number (PO) then we display the Purchase Order details by
using ME23N transaction. If the user clicks on any Vendor then we display the vendor details by
using XK03 transaction.
HINT: EBELN, BSART, LIFNR, EBELP, MENGE


REPORT YRAKESH_ALV_TRANS .

TYPE-POOLS SLIS.
DATA V1 LIKE EKKO-EBELN.

SELECT-OPTIONS S_EBELN FOR V1 .

***DECLARE ITs

DATA : BEGIN OF WA_EKKO,
 EBELN LIKE EKKO-EBELN,
 BSART LIKE EKKO-BSART,
 LIFNR LIKE EKKO-LIFNR,
 END OF WA_EKKO.

DATA IT_EKKO LIKE TABLE OF WA_EKKO.

DATA: BEGIN OF WA_EKPO,
 EBELN LIKE EKPO-EBELN,
 EBELP LIKE EKPO-EBELP,
 MENGE LIKE EKPO-MENGE,
 MEINS LIKE EKPO-MEINS,
 NETPR LIKE EKPO-NETPR,
 COL(4) TYPE C,
 END OF WA_EKPO.

DATA IT_EKPO LIKE TABLE OF WA_EKPO.

DATA : BEGIN OF WA_FINAL,
 EBELN LIKE EKKO-EBELN,
 BSART LIKE EKKO-BSART,
 LIFNR LIKE EKKO-LIFNR,
 EBELP LIKE EKPO-EBELP,
 MENGE LIKE EKPO-MENGE,
 END OF WA_FINAL.

DATA IT_FINAL LIKE TABLE OF WA_FINAL.

***FILLING DATA INTO ITS USING FOR ALL ENTRIES.

SELECT EBELN BSART LIFNR FROM EKKO INTO TABLE IT_EKKO WHERE EBELN
IN
S_EBELN.

IF NOT IT_EKKO IS INITIAL.
SELECT EBELN EBELP MENGE FROM EKPO INTO TABLE IT_EKPO FOR ALL
ENTRIES IN
IT_EKKO WHERE EBELN = IT_EKKO-EBELN.
ENDIF.

LOOP AT IT_EKPO INTO WA_EKPO.
WA_FINAL-EBELN = WA_EKPO-EBELN.
WA_FINAL-EBELP = WA_EKPO-EBELP.
WA_FINAL-MENGE = WA_EKPO-MENGE.
READ TABLE IT_EKKO INTO WA_EKKO WITH KEY EBELN = WA_EKPO-EBELN.
WA_FINAL-BSART = WA_EKKO-BSART.
WA_FINAL-LIFNR = WA_EKKO-LIFNR.
APPEND WA_FINAL TO IT_FINAL.
ENDLOOP.

***DECLARE CATALOG

DATA IT_FCAT TYPE SLIS_T_FIELDCAT_ALV.
DATA WA_FCAT LIKE LINE OF IT_FCAT.

***FILLING CATALOG

CALL FUNCTION 'REUSE_ALV_FIELDCATALOG_MERGE'
EXPORTING
 I_PROGRAM_NAME = SY-CPROG
 I_INTERNAL_TABNAME = 'WA_FINAL'
 I_INCLNAME = SY-CPROG
 CHANGING
 CT_FIELDCAT = IT_FCAT.

***DECLARE IT EVENTS TAB.

DATA : IT_EVENT TYPE SLIS_T_EVENT,
 WA_EVENT LIKE LINE OF IT_EVENT.

*** FILLING IT EVENT

WA_EVENT-NAME = 'USER_COMMAND'.
WA_EVENT-FORM = 'ZUC'.
APPEND WA_EVENT TO IT_EVENT.

*** DISPLAY OUTPUT.

CALL FUNCTION 'REUSE_ALV_GRID_DISPLAY'
EXPORTING
 I_CALLBACK_PROGRAM = SY-CPROG
 IT_FIELDCAT = IT_FCAT
 IT_EVENTS = IT_EVENT
 TABLES
 T_OUTTAB = IT_FINAL.

*** DEF OF ZUC.

FORM ZUC USING A LIKE SY-UCOMM B TYPE SLIS_SELFIELD.
IF B-FIELDNAME = 'LIFNR'.
 SET PARAMETER ID 'LIF' FIELD B-VALUE.
 CALL TRANSACTION 'XK03' AND SKIP FIRST SCREEN.
ELSEIF B-FIELDNAME = 'EBELN'.
 SET PARAMETER ID 'BES' FIELD B-VALUE.
 CALL TRANSACTION 'ME23N'.
ENDIF.
ENDFORM.
OBJECT:

To display the Material Numbers, Material types and Material Group by using ALV and
also provide the HOTSPOT to the Material and Red Colour to Material Group.

REPORT YRAKESH_ALV_MATARIAL .

TYPE-POOLS SLIS.

***DECLARING IT

DATA: BEGIN OF WA_MARA,
 MATNR LIKE MARA-MATNR,
 MTART LIKE MARA-MTART,
 MATKL LIKE MARA-MATKL,
 END OF WA_MARA.

DATA IT_MARA LIKE TABLE OF WA_MARA.

***FILLING IT_MARA

SELECT MATNR MTART MATKL FROM MARA INTO TABLE IT_MARA .

***DECLARING IT_FCAT.

DATA : IT_FCAT TYPE SLIS_T_FIELDCAT_ALV,
 WA_FCAT LIKE LINE OF IT_FCAT.

***FILLING IT_FCAT.

CALL FUNCTION 'REUSE_ALV_FIELDCATALOG_MERGE'
EXPORTING
 I_PROGRAM_NAME = SY-CPROG
 I_INTERNAL_TABNAME = 'WA_MARA'
 I_INCLNAME = SY-CPROG
 CHANGING
 CT_FIELDCAT = IT_FCAT.

***CUSTOMIZING

 WA_FCAT-HOTSPOT = 'X'.
 MODIFY IT_FCAT FROM WA_FCAT TRANSPORTING HOTSPOT
 WHERE FIELDNAME = 'MATNR'.
 WA_FCAT-EMPHASIZE = 'C610'.
 MODIFY IT_FCAT FROM WA_FCAT TRANSPORTING EMPHASIZE
 WHERE FIELDNAME = 'MATKL'.

****DISPLAY OUT PUT

CALL FUNCTION 'REUSE_ALV_GRID_DISPLAY'
EXPORTING
 IT_FIELDCAT = IT_FCAT
 TABLES
 T_OUTTAB = IT_MARA.

BLOCKED ALV:

Blocked ALV is used to display the output in Block wise.

STEPS TO WORK WITH BLOCKED ALV:

1. Intialize the Blocked ALV using 'REUSE_ALV_BLOCK_LIST_INIT' function module.
 The input for above function module is CURRENT PROGRAM NAME.
2. Append the each block/Internal table to blocked ALV by using
'REUSE_ALV_BLOCK_LIST_APPEND' Function module.

The input for the above function module is
1. Data Internal Table
2. Filed Catalog Internal Table
3. Event Internal Table
4. Layout Work Area
   Repeat the same STEP 2 for all the internal tables.
3. Display the blocked ALV by Using 'REUSE_ALV_BLOCK_LIST_DISPLAY' function
module.

OBJECT:

Based on given Purchasing Document numbers to display the Document Header Details
(EBELN,BSART,LIFNR,BUKRS) and Item Details
(EBELN,EBELP,MENGE,MEINS,NERPR) By using Blocked ALV.

REPORT YRAKESH_BALV_PODETAILS .

TYPE-POOLS SLIS.

DATA V1 LIKE EKKO-EBELN.

SELECT-OPTIONS S_EBELN FOR V1.

***DECLARE IT TABLES.

DATA : BEGIN OF WA_EKKO,
 EBELN LIKE EKKO-EBELN,
 BSART LIKE EKKO-BSART,
 LIFNR LIKE EKKO-LIFNR,
 BUKRS LIKE EKKO-BUKRS,
 END OF WA_EKKO.

DATA IT_EKKO LIKE TABLE OF WA_EKKO.

DATA: BEGIN OF WA_EKPO,
 EBELN LIKE EKPO-EBELN,
 EBELP LIKE EKPO-EBELP,
 MENGE LIKE EKPO-MENGE,
 MEINS LIKE EKPO-MEINS,
 NETPR LIKE EKPO-NETPR,
 END OF WA_EKPO.

DATA IT_EKPO LIKE TABLE OF WA_EKPO.

***FILL THE IT TABLES.

 SELECT EBELN BSART LIFNR BUKRS FROM EKKO INTO TABLE IT_EKKO
WHERE
 EBELN IN S_EBELN.

IF NOT IT_EKKO IS INITIAL.

 SELECT EBELN EBELP MENGE MEINS NETPR FROM EKPO INTO TABLE
IT_EKPO FOR
ALL ENTRIES IN IT_EKKO WHERE EBELN = IT_EKKO-EBELN.

ENDIF.

***DECLARE IT_FCAT.

DATA : IT_FCAT1 TYPE SLIS_T_FIELDCAT_ALV,
 IT_FCAT2 TYPE SLIS_T_FIELDCAT_ALV.

***FILL IT_FCAT.

CALL FUNCTION 'REUSE_ALV_FIELDCATALOG_MERGE'
EXPORTING
 I_PROGRAM_NAME = SY-CPROG
 I_INTERNAL_TABNAME = 'WA_EKKO'
 I_INCLNAME = SY-CPROG
 CHANGING
 CT_FIELDCAT = IT_FCAT1.
CALL FUNCTION 'REUSE_ALV_FIELDCATALOG_MERGE'
EXPORTING
 I_PROGRAM_NAME = SY-CPROG
 I_INTERNAL_TABNAME = 'WA_EKPO'
 I_INCLNAME = SY-CPROG
 CHANGING
 CT_FIELDCAT = IT_FCAT2.

***DECLARE IT_EVENT.

DATA: IT_EVENT1 TYPE SLIS_T_EVENT,
 IT_EVENT2 TYPE SLIS_T_EVENT.

*** DECLARE WA_LAYOUT.

DATA: WA_LAYOUT1 TYPE SLIS_LAYOUT_ALV,
 WA_LAYOUT2 TYPE SLIS_LAYOUT_ALV.

***INTIALIZE BLOCKED ALV.
CALL FUNCTION 'REUSE_ALV_BLOCK_LIST_INIT'
 EXPORTING
 I_CALLBACK_PROGRAM = SY-CPROG.

***APPENDING BLOCK LIST.
CALL FUNCTION 'REUSE_ALV_BLOCK_LIST_APPEND'
 EXPORTING
 IS_LAYOUT = WA_LAYOUT1
 IT_FIELDCAT = IT_FCAT1
 I_TABNAME = 'IT_EKKO'
 IT_EVENTS = IT_EVENT1
 TABLES
 T_OUTTAB = IT_EKKO.
CALL FUNCTION 'REUSE_ALV_BLOCK_LIST_APPEND'
 EXPORTING
 IS_LAYOUT = WA_LAYOUT2
 IT_FIELDCAT = IT_FCAT2
 I_TABNAME = 'IT_EKPO'
 IT_EVENTS = IT_EVENT2
 TABLES
 T_OUTTAB = IT_EKPO.

***DISPLAY OUTPUT.
CALL FUNCTION 'REUSE_ALV_BLOCK_LIST_DISPLAY'.

OBJECT: (ASSIGNMENT):

Based on given Company codes to display the company details (BUKRS,BUTXT,ORT01) & Customers details under Company (BUKRS,KUNNR,AKONT) and display Customer Bank Details (KUNNR,BANKS,BANKL,BANKN) by using Blocked ALV.

REPORT YRAKESH_BALV_3TAB .

TYPE-POOLS SLIS.

DATA V1 LIKE T001-BUKRS.

SELECT-OPTIONS S_BUKRS FOR V1.

***DECLARE IT TABLES.

DATA : BEGIN OF WA_T001,
 BUKRS LIKE T001-BUKRS,
 BUTXT LIKE T001-BUTXT,
 ORT01 LIKE T001-ORT01,
 END OF WA_T001.

DATA IT_T001 LIKE TABLE OF WA_T001.

DATA : BEGIN OF WA_KNB1,
 KUNNR LIKE KNB1-KUNNR,
 BUKRS LIKE KNB1-BUKRS,
 AKONT LIKE KNB1-AKONT,
 PERNR LIKE KNB1-PERNR,
 END OF WA_KNB1.

DATA IT_KNB1 LIKE TABLE OF WA_KNB1.
DATA: BEGIN OF WA_KNBK,
 KUNNR LIKE KNBK-KUNNR,
 BANKS LIKE KNBK-BANKS,
 BANKL LIKE KNBK-BANKL,
 BANKN LIKE KNBK-BANKN,
 END OF WA_KNBK.
DATA IT_KNBK LIKE TABLE OF WA_KNBK.

***FILL THE IT TABLES.

SELECT BUKRS BUTXT ORT01 FROM T001 INTO TABLE IT_T001 WHERE BUKRS
IN
S_BUKRS.

IF NOT IT_T001 IS INITIAL.
 SELECT KUNNR BUKRS AKONT PERNR FROM KNB1 INTO TABLE IT_KNB1
FOR ALL
 ENTRIES IN IT_T001 WHERE BUKRS = IT_T001-BUKRS.
ENDIF.

IF NOT IT_KNB1 IS INITIAL.
 SELECT KUNNR BANKS BANKL BANKN FROM KNBK INTO TABLE IT_KNBK
FOR ALL
 ENTRIES IN IT_KNB1 WHERE KUNNR = IT_KNB1-KUNNR.
ENDIF.

***DECLARE IT_FCAT.

DATA : IT_FCAT1 TYPE SLIS_T_FIELDCAT_ALV,
 IT_FCAT2 TYPE SLIS_T_FIELDCAT_ALV,
 IT_FCAT3 TYPE SLIS_T_FIELDCAT_ALV.

***FILL IT_FCAT.

CALL FUNCTION 'REUSE_ALV_FIELDCATALOG_MERGE'
EXPORTING
 I_PROGRAM_NAME = SY-CPROG
 I_INTERNAL_TABNAME = 'WA_T001'
 I_INCLNAME = SY-CPROG
 CHANGING
 CT_FIELDCAT = IT_FCAT1.
CALL FUNCTION 'REUSE_ALV_FIELDCATALOG_MERGE'
EXPORTING
 I_PROGRAM_NAME = SY-CPROG
 I_INTERNAL_TABNAME = 'WA_KNB1'
 I_INCLNAME = SY-CPROG
 CHANGING
 CT_FIELDCAT = IT_FCAT2.
CALL FUNCTION 'REUSE_ALV_FIELDCATALOG_MERGE'
EXPORTING
 I_PROGRAM_NAME = SY-CPROG
 I_INTERNAL_TABNAME = 'WA_KNBK'
 I_INCLNAME = SY-CPROG
 CHANGING
 CT_FIELDCAT = IT_FCAT3.

***DECLARE IT_EVENT.

DATA: IT_EVENT1 TYPE SLIS_T_EVENT,
 IT_EVENT2 TYPE SLIS_T_EVENT,
 IT_EVENT3 TYPE SLIS_T_EVENT.

*** DECLARE WA_LAYOUT.

DATA: WA_LAYOUT1 TYPE SLIS_LAYOUT_ALV,
 WA_LAYOUT2 TYPE SLIS_LAYOUT_ALV,
 WA_LAYOUT3 TYPE SLIS_LAYOUT_ALV.

***INTIALIZE BLOCKED ALV.

CALL FUNCTION 'REUSE_ALV_BLOCK_LIST_INIT'
 EXPORTING
 I_CALLBACK_PROGRAM = SY-CPROG.
***APPENDING BLOCK LIST.
CALL FUNCTION 'REUSE_ALV_BLOCK_LIST_APPEND'
 EXPORTING
 IS_LAYOUT = WA_LAYOUT1
 IT_FIELDCAT = IT_FCAT1
 I_TABNAME = 'IT_T001'
 IT_EVENTS = IT_EVENT1
 TABLES
 T_OUTTAB = IT_T001.
CALL FUNCTION 'REUSE_ALV_BLOCK_LIST_APPEND'
 EXPORTING
 IS_LAYOUT = WA_LAYOUT2
 IT_FIELDCAT = IT_FCAT2
 I_TABNAME = 'IT_KNB1'
 IT_EVENTS = IT_EVENT2
 TABLES
 T_OUTTAB = IT_KNB1.

CALL FUNCTION 'REUSE_ALV_BLOCK_LIST_APPEND'
 EXPORTING
 IS_LAYOUT = WA_LAYOUT3
 IT_FIELDCAT = IT_FCAT3
 I_TABNAME = 'IT_KNBK'
 IT_EVENTS = IT_EVENT3
 TABLES
 T_OUTTAB = IT_KNBK.

***DISPLAY OUTPUT.
CALL FUNCTION 'REUSE_ALV_BLOCK_LIST_DISPLAY'.

HIERARCHICAL ALV:

This is used to display the Header and Item Details in Hierarchical Manner.

REUSE_ALV_HIERSEQ_ LIST_DISPLAY:

It is function module which is used to display the output in hierarchical manner the input
for the above function module is two Data Internal Tables (Header, Item), Field Catalogue
Internal Table, Key Information (linking fields of Header and Item)
*&---------------------------------------------------------------------*
* To display Purchasing Document header and item details by using
* heirarchical ALV Based on Purchasing document No.
*&---------------------------------------------------------------------*

REPORT YRAKESH_ALV_HIER_EKKOEKPO .

TYPE-POOLS SLIS.

DATA V1 LIKE EKKO-EBELN.

SELECT-OPTIONS S_EBELN FOR V1.

***Declaring Data ITs.

DATA : BEGIN OF WA_EKKO,
 EBELN LIKE EKKO-EBELN,
 BSART LIKE EKKO-BSART,
 LIFNR LIKE EKKO-LIFNR,
 BUKRS LIKE EKKO-BUKRS,
 END OF WA_EKKO.

DATA IT_EKKO LIKE TABLE OF WA_EKKO.

DATA : BEGIN OF WA_EKPO,
 EBELN LIKE EKPO-EBELN,
 EBELP LIKE EKPO-EBELP,
 MENGE LIKE EKPO-MENGE,
 MEINS LIKE EKPO-MEINS,
 NETPR LIKE EKPO-NETPR,
 COL(4) TYPE C,
 END OF WA_EKPO.
DATA IT_EKPO LIKE TABLE OF WA_EKPO.

***Filing Data ITs.

SELECT EBELN BSART LIFNR BUKRS FROM EKKO INTO TABLE IT_EKKO WHERE
EBELN
IN S_EBELN.
SELECT EBELN EBELP MENGE MEINS NETPR FROM EKPO INTO TABLE IT_EKPO
WHERE
EBELN IN S_EBELN.
WA_EKPO-COL = 'C910'.
MODIFY IT_EKPO FROM WA_EKPO TRANSPORTING COL WHERE NETPR > 1000.

***Declaring Field Catalogue IT.

DATA : IT_FCAT TYPE SLIS_T_FIELDCAT_ALV,
 WA_FCAT LIKE LINE OF IT_FCAT.

*** Filling Field Catalogue IT.

WA_FCAT-FIELDNAME = 'EBELN'.
WA_FCAT-COL_POS = '1'.
WA_FCAT-SELTEXT_M = 'PUR.DOC'.
WA_FCAT-TABNAME = 'IT_EKKO'.
APPEND WA_FCAT TO IT_FCAT.
CLEAR WA_FCAT.

WA_FCAT-FIELDNAME = 'BSART'.
WA_FCAT-COL_POS = '2'.
WA_FCAT-SELTEXT_M = 'DOC.TYP'.
WA_FCAT-TABNAME = 'IT_EKKO'.
APPEND WA_FCAT TO IT_FCAT.
CLEAR WA_FCAT.

WA_FCAT-FIELDNAME = 'LIFNR'.
WA_FCAT-COL_POS = '3'.
WA_FCAT-SELTEXT_M = 'VEN.NUM'.
WA_FCAT-TABNAME = 'IT_EKKO'.
APPEND WA_FCAT TO IT_FCAT.
CLEAR WA_FCAT.

WA_FCAT-FIELDNAME = 'BUKRS'.
WA_FCAT-COL_POS = '4'.
WA_FCAT-SELTEXT_M = 'CO.CODE'.
WA_FCAT-TABNAME = 'IT_EKKO'.
APPEND WA_FCAT TO IT_FCAT.
CLEAR WA_FCAT.

WA_FCAT-FIELDNAME = 'EBELN'.
WA_FCAT-COL_POS = '1'.
WA_FCAT-SELTEXT_M = 'PUR.DOC'.
WA_FCAT-TABNAME = 'IT_EKPO'.
APPEND WA_FCAT TO IT_FCAT.
CLEAR WA_FCAT.

WA_FCAT-FIELDNAME = 'EBELP'.
WA_FCAT-COL_POS = '2'.
WA_FCAT-SELTEXT_M = 'DOC.TYP'.
WA_FCAT-TABNAME = 'IT_EKPO'.
APPEND WA_FCAT TO IT_FCAT.
CLEAR WA_FCAT.

WA_FCAT-FIELDNAME = 'MENGE'.
WA_FCAT-COL_POS = '3'.
WA_FCAT-SELTEXT_M = 'QTY'.
WA_FCAT-TABNAME = 'IT_EKPO'.
APPEND WA_FCAT TO IT_FCAT.
CLEAR WA_FCAT.

WA_FCAT-FIELDNAME = 'MEINS'.
WA_FCAT-COL_POS = '4'.
WA_FCAT-SELTEXT_M = 'UOM'.
WA_FCAT-TABNAME = 'IT_EKPO'.
APPEND WA_FCAT TO IT_FCAT.
CLEAR WA_FCAT.

WA_FCAT-FIELDNAME = 'NETPR'.
WA_FCAT-COL_POS = '5'.
WA_FCAT-SELTEXT_M = 'PRICE'.
WA_FCAT-TABNAME = 'IT_EKPO'.
APPEND WA_FCAT TO IT_FCAT.
CLEAR WA_FCAT.

*** Declaring WA for key

DATA : WA_KEY TYPE SLIS_KEYINFO_ALV.

***Filling the Key Info.

WA_KEY-HEADER01 = 'EBELN'.
WA_KEY-ITEM01 = 'EBELN'.

***Displaying Output.

CALL FUNCTION 'REUSE_ALV_HIERSEQ_LIST_DISPLAY'
 EXPORTING
 I_CALLBACK_PROGRAM = SY-CPROG
 IT_FIELDCAT = IT_FCAT
 I_TABNAME_HEADER = 'IT_EKKO'
 I_TABNAME_ITEM = 'IT_EKPO'
 IS_KEYINFO = WA_KEY
 TABLES
 T_OUTTAB_HEADER = IT_EKKO
 T_OUTTAB_ITEM = IT_EKPO.

BKPF (Accounting Document Header Table)
BELNR ---Accounting Document Number
GJAHR ---Fiscal Year
BUKRS --- Company Code
BLART --- Document Type
BUDAT --- Posting Date
BLDAT ---Document Date

BSEG (Accounting Document Item Table)
BELNR ---Accounting Document Number
GJAHR ---Fiscal Year
BUKRS --- Company Code
BUZEI --- Item
DMBTR --- Amount in Local Currency
WRBTR --- Amount in Document Currency

OBJECT: ASSIGNMENT

To display the Accounting Document Header and Item details by Using Hierarchical ALV based
given financial year.

REPORT YRAKESH_HIRARCHICAL_ALV1 .

TYPE-POOLS SLIS.

DATA V1 LIKE BKPF-GJAHR.

SELECT-OPTIONS S_GJAHR FOR V1.
DATA V2 LIKE BKPF-BUKRS.
SELECT-OPTIONS S_BUKRS FOR V2.

***DECLARING IT TABLES.

DATA : BEGIN OF WA_BKPF,
 BELNR LIKE BKPF-BELNR,
 GJAHR LIKE BKPF-GJAHR,
 BUKRS LIKE BKPF-BUKRS,
 BLART LIKE BKPF-BLART,
 BUDAT LIKE BKPF-BUDAT,
 BLDAT LIKE BKPF-BLDAT,
 END OF WA_BKPF.

DATA IT_BKPF LIKE TABLE OF WA_BKPF.

DATA : BEGIN OF WA_BSEG,
 BELNR LIKE BSEG-BELNR,
 GJAHR LIKE BSEG-GJAHR,
 BUKRS LIKE BSEG-BUKRS,
 BUZEI LIKE BSEG-BUZEI,
 DMBTR LIKE BSEG-DMBTR,
 WRBTR LIKE BSEG-WRBTR,
 END OF WA_BSEG.
DATA IT_BSEG LIKE TABLE OF WA_BSEG.
INCLUDE YRAKESH_IT_BKPF.
INCLUDE YRAKESH_IT_BSEG.

***FILLING IT

SELECT BELNR GJAHR BUKRS BLART BUDAT BLDAT FROM BKPF INTO TABLE
IT_BKPF
WHERE GJAHR IN S_GJAHR AND BUKRS IN S_BUKRS.
SELECT BELNR GJAHR BUKRS BUZEI DMBTR WRBTR FROM BSEG INTO TABLE
IT_BSEG
WHERE GJAHR IN S_GJAHR AND BUKRS IN S_BUKRS.

***DECLARE IT_FCAT.

DATA : IT_FCAT TYPE SLIS_T_FIELDCAT_ALV,
 WA_FCAT LIKE LINE OF IT_FCAT.

***FILLING FIELD CATALOG
*** FILLING FOR BKPF(ACCOUNT DOCUMENT HEADER)

WA_FCAT-FIELDNAME = 'BELNR'.
WA_FCAT-COL_POS = '1'.
WA_FCAT-SELTEXT_S = 'ACC.DOC.NO'.
WA_FCAT-TABNAME = 'IT_BKPF'.
APPEND WA_FCAT TO IT_FCAT.

WA_FCAT-FIELDNAME = 'GJAHR'.
WA_FCAT-COL_POS = '2'.
WA_FCAT-SELTEXT_S = 'FISCAL YR'.
WA_FCAT-TABNAME = 'IT_BKPF'.
APPEND WA_FCAT TO IT_FCAT.

WA_FCAT-FIELDNAME = 'BUKRS'.
WA_FCAT-COL_POS = '3'.
WA_FCAT-SELTEXT_S = 'COMPANY CODE'.
WA_FCAT-TABNAME = 'IT_BKPF'.
APPEND WA_FCAT TO IT_FCAT.

WA_FCAT-FIELDNAME = 'BLART'.
WA_FCAT-COL_POS = '4'.
WA_FCAT-SELTEXT_S = 'A/C_DOC_TY'.
WA_FCAT-OUTPUTLEN = '8'.
WA_FCAT-TABNAME = 'IT_BKPF'.
APPEND WA_FCAT TO IT_FCAT.

WA_FCAT-FIELDNAME = 'BUDAT'.
WA_FCAT-COL_POS = '5'.
WA_FCAT-SELTEXT_S = 'POST_DATE'.
WA_FCAT-TABNAME = 'IT_BKPF'.
APPEND WA_FCAT TO IT_FCAT.

WA_FCAT-FIELDNAME = 'BLDAT'.
WA_FCAT-COL_POS = '6'.
WA_FCAT-SELTEXT_S = 'DOC_DATE'.
WA_FCAT-TABNAME = 'IT_BKPF'.
APPEND WA_FCAT TO IT_FCAT.

***FILLING FOR BSEG(ACCOUNTING ITEM TABLE)

WA_FCAT-FIELDNAME = 'BELNR'.
WA_FCAT-COL_POS = '1'.
WA_FCAT-SELTEXT_S = 'ACC.DOC.NO'.
WA_FCAT-TABNAME = 'IT_BSEG'.
APPEND WA_FCAT TO IT_FCAT.

WA_FCAT-FIELDNAME = 'GJAHR'.
WA_FCAT-COL_POS = '2'.
WA_FCAT-SELTEXT_S = 'FISCAL YR'.
WA_FCAT-TABNAME = 'IT_BSEG'.
APPEND WA_FCAT TO IT_FCAT.

WA_FCAT-FIELDNAME = 'BUKRS'.
WA_FCAT-COL_POS = '3'.
WA_FCAT-SELTEXT_S = 'COMPANY CODE'.
WA_FCAT-TABNAME = 'IT_BSEG'.
APPEND WA_FCAT TO IT_FCAT.

WA_FCAT-FIELDNAME = 'BUZEI'.
WA_FCAT-COL_POS = '4'.
WA_FCAT-SELTEXT_S = 'ITEM'.
WA_FCAT-TABNAME = 'IT_BSEG'.
APPEND WA_FCAT TO IT_FCAT.

WA_FCAT-FIELDNAME = 'DMBTR'.
WA_FCAT-COL_POS = '5'.
WA_FCAT-SELTEXT_S = 'LOCAL_CURR.'.
WA_FCAT-TABNAME = 'IT_BSEG'.
APPEND WA_FCAT TO IT_FCAT.

WA_FCAT-FIELDNAME = 'WRBTR'.
WA_FCAT-COL_POS = '6'.
WA_FCAT-SELTEXT_S = 'DOC_CURR.'.
WA_FCAT-TABNAME = 'IT_BSEG'.
APPEND WA_FCAT TO IT_FCAT.

DATA WA_KEY TYPE SLIS_KEYINFO_ALV.
*DATA WA_KEY LIKE LINE OF IT_KEY.

***FILING THE KEY INFO .

WA_KEY-HEADER01 = 'BELNR'.
WA_KEY-ITEM01 = 'BELNR'.
WA_KEY-HEADER02 = 'GJAHR'.
WA_KEY-ITEM02 = 'GJAHR'.
WA_KEY-HEADER03 = 'BUKRS'.
WA_KEY-ITEM03 = 'BUKRS'.

 CALL FUNCTION 'REUSE_ALV_HIERSEQ_LIST_DISPLAY'
 EXPORTING
 IT_FIELDCAT = IT_FCAT
 I_TABNAME_HEADER = 'IT_BKPF'
 I_TABNAME_ITEM = 'IT_BSEG'
 IS_KEYINFO = WA_KEY
 TABLES
 T_OUTTAB_HEADER = IT_BKPF
 T_OUTTAB_ITEM = IT_BSEG.
WORKING WITH GUI IN ALV:

In the real time we always copy existing GUI and add the additional menu items to that GUI.

NOTE: SAPLKKBL is the standard program which contains Standard GUI.
NOTE: PF_STATUS_SET is the event which is used to attach our own GUI to the program in ALV.

SOME OF THE FIELDS OF LAYOUT WORK AREA:

1. COLWIDTH_OPTIMIZE ----  Compress the field width “ Active = ‘x’, Inactive =’ ’
2. ZEBRA ----- Stripped Pattern
3. INFO_FIELDNAME ---- Colour

STEPS TO WORK WITH ROW COLOUR:
1. Add one colour field in Data internal table which is of Data type CHAR length 4.
2. After filling the data internal table, we modify the colour field based on condition.
3. Pass the colour field name in the lay work area. 135,000.

STEPS TO COPY THE EXISTING GUI:

  •  Execute SE 41
  •  Click on STATUS in Application tool bar.
  •  Provide FROM
PROGRAM: SAPLKKBL
STATUS: Standard- FullScreen.
To
PROGRAM: YSPRAO_GUI (Your program name)
STATUS: STAT (Your program Status).
  •  Click on COPY
OBJECT:
*&---------------------------------------------------------------------*
*To display Purchasing doc no.,Item no's,Quantity,UOM and Netprice by using ALV and also diplay *the purchase documents no.in RED color if the amount is more than thousand and also add one menu *item(DOWNLOAD) in application tool bar if we are clicking on Download Button the we download *data into Desktop.
*&---------------------------------------------------------------------*

REPORT YRAKESH_ALV_GUI .

TYPE-POOLS SLIS.
DATA V1 LIKE EKPO-EBELN.
SELECT-OPTIONS S_EBELN FOR V1.

***DECLARE DATA IT.

INCLUDE YRAKESH_IT_EKPO.

***FILLING DATA IT.

SELECT EBELN EBELP MENGE MEINS NETPR FROM EKPO INTO TABLE
IT_EKPO WHERE
EBELN IN S_EBELN.
WA_EKPO-COL = 'C610'.
MODIFY IT_EKPO FROM WA_EKPO TRANSPORTING COL WHERE NETPR > 1000.

***DECLARE FIELDCATALOG IT.

DATA : IT_FCAT TYPE SLIS_T_FIELDCAT_ALV,
 WA_FCAT LIKE LINE OF IT_FCAT.

***FILLING FIELDCATLOG IT.

WA_FCAT-FIELDNAME = 'EBELN'.
WA_FCAT-COL_POS = '1'.
WA_FCAT-SELTEXT_M = 'PUR_DOC_NO'.
APPEND WA_FCAT TO IT_FCAT.
CLEAR WA_FCAT.

WA_FCAT-FIELDNAME = 'EBELP'.
WA_FCAT-COL_POS = '2'.
WA_FCAT-SELTEXT_M = 'ITEM NO'.
APPEND WA_FCAT TO IT_FCAT.
CLEAR WA_FCAT.

WA_FCAT-FIELDNAME = 'MENGE'.
WA_FCAT-COL_POS = '3'.
WA_FCAT-SELTEXT_M = 'Quantity'.
APPEND WA_FCAT TO IT_FCAT.
CLEAR WA_FCAT.

WA_FCAT-FIELDNAME = 'MEINS'.
WA_FCAT-COL_POS = '4'.
WA_FCAT-SELTEXT_M = 'UOM'.
APPEND WA_FCAT TO IT_FCAT.
CLEAR WA_FCAT.

WA_FCAT-FIELDNAME = 'NETPR'.
WA_FCAT-COL_POS = '5'.
WA_FCAT-SELTEXT_M = 'PRICE'.
APPEND WA_FCAT TO IT_FCAT.
CLEAR WA_FCAT.

***DECLARE WORK AREA FOR LAY OUT.

DATA WA_LAYOUT TYPE SLIS_LAYOUT_ALV.

***FILLING LAYOUT WA.

WA_LAYOUT-INFO_FIELDNAME = 'COL'.
WA_LAYOUT-COLWIDTH_OPTIMIZE = 'X'.
WA_LAYOUT-ZEBRA = 'X'.

***DECLARE IT EVENT.

DATA : IT_EVENT TYPE SLIS_T_EVENT,
 WA_EVENT LIKE LINE OF IT_EVENT.

***FILL THE IT EVENT.

WA_EVENT-NAME = 'PF_STATUS_SET'.
WA_EVENT-FORM = 'ZPSS'.
APPEND WA_EVENT TO IT_EVENT.
CLEAR WA_EVENT.
WA_EVENT-NAME = 'USER_COMMAND'.
WA_EVENT-FORM = 'ZUC'.
APPEND WA_EVENT TO IT_EVENT.
CLEAR WA_EVENT.

***DISPLAY O/P.

CALL FUNCTION 'REUSE_ALV_GRID_DISPLAY'
EXPORTING
 I_CALLBACK_PROGRAM = SY-CPROG
 IS_LAYOUT = WA_LAYOUT
 IT_FIELDCAT = IT_FCAT
 IT_EVENTS = IT_EVENT
 TABLES
 T_OUTTAB = IT_EKPO.

***FILLING THE FORMS

FORM ZPSS USING A TYPE SLIS_T_EXTAB.
SET PF-STATUS 'STAT'.
ENDFORM.

FORM ZUC USING B LIKE SY-UCOMM C TYPE SLIS_SELFIELD.
IF B = 'DOWN'.
CALL FUNCTION 'DOWNLOAD'
EXPORTING
 FILETYPE = 'DAT'
 TABLES
 DATA_TAB = IT_EKPO.
ENDIF.
ENDFORM.
MODULE POOL PROGRAMMING

Transaction /Dialog pool programming /Module pool programming.

 A transaction is the collection of sequential screen which accept the input and display the output.


Screen painter – SE41.
-This is also called dialog pool programming since we have an interaction b/n screen.
-It is also called module programming because the flow logic of each screen acts as module.
-A transaction contains either executable program or module pool program.

Steps to create the transaction code for executable program.


Steps to work with module pool program

1. Create a module pool program and implement the retrieving logic
2. Design the required screen and attach to the program
3. Design the required menus and attach to the screen
4. Design the database table based on client requirement

Note:
-the above four transaction codes we can work with in a single transaction i.e. SE80

Steps to create a module pool program


1. Attrivbute: Attribute specify the type of the screen either normal or sub screen or dialog screen.

2. Layout: Layout is the collection of screen element that input/output screen, push button, radio
button, check box, table control.

3. Element list: Elements list contains the entire screen element which design in the current
screen and this data types and length.

4. Flow logic editor: Flow logic editor contains logic related to the screen.
 - The linking or communication b/n flow logic editor to abap editor is always through
screen element that is each element in the screen that should be an equalent declaration is
available in abap editor.

Event in flow logic editor

 1. PBO (Process before Output)
 2. PAI (Process after Input)
 3. POV (Process on Value Request)
 4. POH (Process on Help request)

1. PBO: It is an event which is trigger before displaying the screen.
 -this is used to provide the default values to the screen.

2. PAI: It is an event which is triggers often providing the input to the screen.
 -this is used to implement the logic.

3. POV: is an event which is trigger at the time of user clicks on f4 button.
 -this is used to provide the list of possible values to the given input variable.

4. POH: is an event which trigger at the time of user clicks on F1 button.
 -this is used to provide the help (F1) documentation.

Steps to Design the screen

 -select the program in the left panel.
 -right click
 -create Screen
 -provide the screen number
 -provide short description
 -save
-click on Layout.

 -Design the screen as per the client requirement 


-Save
 -Back.

Steps to activate the program

 -Double click on program in the left panel
 -Right click
 -Activate

 Steps to execute transaction code

 -select the program in left panel
 -right click
 -create Transaction
 -provide your transaction code
 -provide short description
 -enter
 -select first radio button.
 -Provide program name -screen no -save.

Step to execute the program

 -select the transaction code in the left panel
 -right click
 -execute Direct processing

Source code:


-->Obi 


-Save
 -Back.

Note:

 -if we want to design the screen with db fields then open the screen (layout) click on F4
(dictionary program field)
 -provide your db table name
 -enter
 -select your require fields
 -enter.

Source code:
Obi
 -create table
ZVENEQF


VRM-SETT-VALUES:
 -Is the function module which is used to provide dropdown list to the any input variable.
 -The input for the above function module is field name for which field we want to provide dropdown list.
 -An internal table of which contains two fields that are key and text.

NOTE:

 -In VRM we have type that is VRM_VALUES which contains the above two fields. So, that we simple declare our internal table by referring VRM-VALUES.
-If we want to provide mask double click on field (in the Layout)
-In the attribute


-in the attribute click on display tab-Invisible

CODE

Ranges:
 - is the keyword which accept single value multiple single values, single range and multiple ranges.

 Syntax:

 RANGES <NAMEOF THE RANGE> FOR <VARIABLE NAME>
 EX:
 DATA V1 LIKE T001-BUKRS.
 RANGES R-BUKRS FOR V1.

 -The name of range acts as internal table with header line.
 -That mean the name of the work area and name of the internal table is same as the
ranges.


Code
WORKING WITH SUBSCREEN AREAS
 -Sub screen area must be placed in normal screen only.
 -each sub screen area can call only one sub screen at a time.

Syntax of include or calling the sub screen into sub screen areas

 Call subsreen <sub screen area name> including <program name> <screen no>
 EX:
 CALL SUBSCREEN SA1 INCLUDING SY-REPID '100'.

NOTE:

 SY-REPID: Is the system variable which contains the current program name.
-if we want to enable the PAI of sub screens then we must call the sub screen area name
in the PAI of normal screen.

Screen
Code

Working with tab strip control
 -tab strip is the strip of tab each tab contains only one sub screens area.
 -each sub screen area can call only one sub screen at a time.
 - By default tab strip contains 2 tabs.
 -only one tab is always active.

Declaring the tab strip in the ABAP editor
 CONTROLS <TAB STRIP NAME> TYPE TABSTRIP.
 EX: CONTROLS TBC TYPE TABSTRIP.

By default the PBO of each screen contains GUI title and GUI status
Syntax of active the tab

 <TAB STRIP NAME>-ACTIVE TAB = '<TAB NAME> '.
 EX:
 TBC-ACTIVETAB = ‗TAB1.‘

 SCREEN
 CODE

Working with process on value request (POV)
Note
 -'F4IF_INT-_TABLE_VALUE_REQUEST' is the function is module which is used to provide the list of possible values to the input variable.
 - The input for the above function module is
 -data internal table
 -return field of data internal table
 -field name (for which field we want to provide list of possiblevalue)
 -screen no (the field is available in which screen)
 -program name (screen is attached to which program)
Note
-leave to list-processing: is used to display the output like in ordinary reports
-->Obi
Screen
Code

Working with validation
 -there are three type of validation
 1. System validation
 2. Validation at flow logic editor
 3. Validation at abap editor
1. System validation:
 -whenever we are working with date and range of input then the system perform validation.
That is the given data is valid format or not.
-the lower limit is less then upper limit or not.
-system automatically perform this validation.

2. Validation at flow logic editor
 Note: validation always done at PAI event.
 Syntax:
 FIELD <FIELDNAME> VALUES (VALUES1, VALUES2-----).
 For which field we want to validate
 Ex:
 FIELD VALUES ('1000','2000').

3. Validation at abap editor
 Syntax:
 FIELD <FIELDNAME > MODULE <MODULE NAME>
 For which field we want to validate

Chain and end chain
 -is used to validate the related field.
 -if we no using chain and end chain then if display the only; error field in enable mode other field in disable mode, it means we can‘t change the other then error field information.
 -if we are using chain and end chain then it display all the fields (error and non error fields) in
enable mode.

Note

 -when ever we are working with validation then back button is not working if you pass invalid
input.
 -if we want enable the back button functionality or exit button functionality then we must
provide function type is E at the time of funcode.
-and we also implement the logic in the module of at EXIT-COMMAND.
--->OBJ

SCREEN
CODE

-Syntax of calling the executable program from module pool program.
 SUBMIT <EXECUTABLE PROGRAM NAME> VIA SELECTION-SCREEN.

-->OBJ
SCREEN
CODES


 SAP SCRIPT

If you want to print the business document such as invoice. purchase order. sales order etc... We
need LAYOUTs. Layouts are designed through FORMS.

SAP-SCRIPT is a tool used to design the business documents. The SAP provides layouts for almost all the applications. Most of the time ABAPer job is changes the layout or adding some addition
logic to the STANDARD DRIVER PROGRAM. Driver program is used to retrieving the data from the
database and transferred to the LAYOUT SET.

Components of SAP-SCRIPT:

1. LAYOUT
2. DRIVER PROGARM

Component of LAYOUT:

1. HEADER
2. PAGES
3. WINDOWS
4. PAGE WINDOWS
5. PARAGRAPH FORMATS
6. CHARACTER FORMATS
7. DOCUMENTATION

1. HEADER:

Header is used to maintain the administrative information. i.e.. FORM NAME, LANGUAGE,
PAGE FORMAT, FIRST PAGE and DEFAULT PARAGRAPH (Default Settings).

2. PAGES:

Page is the physical area where we can place the window. We can not print the text on page.

3. WINDOWS:
We can place the same window in multiple pages. We can not print the text on window.

4. PAGE WINDOWS:

Page window is nothing but placing the window on the page with co-ordinates (Left. Upper.
Width and Height). We can print text only on the page windows.

5. PARAGRAPH FORMATS:

Paragraph format is used to align the entire PARAGRAPH with same font and same font type.

6. CHARACTER FORMATS:

Character format is used to align the particular text with same font and same font type.

7. DOCUMENTATION:

This is used to maintain the documentation related to FORM.

NOTE: The transaction code for form painter is SE71.

Steps to design the LAYOUT/FORM:

1. Execute SE71, Provide your form name, Click on CREATE. ENETER. Provide short description.
2. Click on PAGES (Application tool bar). In the MENU BAR click on EDIT -> Create Element.
Provide your page name and Description.
3. Click on WINDOWS (Application tool bar). In the MENU BAR click on EDIT -> Create
Element. Provide your window name and Description.
4. Click on Page Windows (Application tool bar). In the MENU BAR click on EDIT -> Create
Element. Select the required window provide left. upper margins. width and height.
Repeat for all the WINDOWS.
MAIN WINDOW is the default window in SAP-SCRIPT. We can place the main Window up to 99
times per page (00 to 98).
5. Click on PARAGRAPH FORMAT (Application tool bar). Provide paragraph format name (any
name) Enter. Provide short description provide FONT. TABS. etc… save.
6. Click on HEADER, Click on basic settings provide your first page and default paragraph. save.

Steps to open the LAYOUT:

1. In the menu bar click on settings -> form painter. select the check box graphic form painter. Enter.
2. In the application tool bar click on layout. align the layout activate.
NOTE: Printing the DATA on the page window is always through SYMBOLS. Each symbol start with & and ends with &. 

There are four types of symbols.

1. PROGRAM SYMBOLS
2. SYSTEM SYMBOLS
3. STANDARD SYMBOLS
4. TEXT SYMBOLS


Steps to place the SYMBOLS on the PAGE WINDOW:

1. Execute SE71. Provide your form name and click on change mode.
2. Click on PAGE WINDOWS. Double click on your WINDOW. Click on text element (left side of
header tab).

COCODE: &WA_T001-BUKRS&
CNAME: & WA_T001-BUTXT&
CCITY: & WA_T001-ORTO1&

Come back. Save and activate (form activate).

Text Element:

Text element is the name given to the black of elements in the page window. The text element
name is followed by /E.
If we pass text element name in the WRITE_FORM function module then WRITE_FORM
transfers the data from driver program to all the statements which are defined under text element.


Working with LOGO:

We can work with .tiff or .BMP image only.

NOTE:

1. When ever we are working with .tiff image then convert .tiff image into TEXT image.
2. RSTXPDFT4 is the standard program which converts tiff to TEXT image.
3. When ever we are working with .BMP image then convert .BMP image into GRAPHICS image.
4. SE78 is the Transaction code to convert .BMP image to GRAPHICS image.

Steps to convert .BMP to GRAPHICS:

1. Execute SE78. Expand graphics in the left panel. Double click on BMAP.
2. Provide your graphics name. select the radio cotton color. click on import (F5) in the application
tool bar.
3. Provide your image path. ENTER.

Steps to include the LOGO in the PAGE WINDOW:

1. Execute SE71, Open the FORM in change mode. double click on LOGO WINDOW and click on
text element.
2. In the menu bar click on insert -> graphics, Select tab stored on document server.
3. Provide your graphics name (which is created in SE78). Select the radio button color grid. Come
back. save activate.

When ever we are working with main window then we must pass text element name in the page
window. otherwise the first record will be printed twice.


Steps to COPY the FORM from one client to another client:

If the form is available in 800 client in $TMP package, if you want to copy into 810 client:

1. Execute SE71. in the menu bar click on utilities -> copy from client.
2. Provide your source form name. source client (800) and provide target form name (same as
source form name or different form name) execute.

If the form is available in 800 client in your own package (DEVK901449), if you want to copy in to
810 client:

1. Execute SCC1. Provide your source client (800). Provide your transport request
(DEVK901449). select check box INCL TASKS FOR REQUEST.
2. Click on Start immediately (F5) in the Application.

Steps to change the OBJECT PACKAGE (Development Class):

1. Execute SM30. provide the table/view as TADIR. click on maintain.
2. Select the check box of your request object and object name. execute.
3. Double click on object remove the old package and provide your new package ENTER.

Steps to maintain the BACK UP of SAP-SCRIPT layout or DOWNLOAD:

NOTE: RSTXSCRP is the standard program which is used to download as well as upload the SAPSCRIPT to PRESENTATION SERVER.

1. Execute SE38. provide program name RSTXSCRP. click on execute.
2. Provide your form name. mode is EXPORT (DOWNLOAD to local drivers). click on execute
provide your path. Execute.

Steps to UPLOAD or RE-LOAD the SAP-SCRIPT:

1. Execute SE38. provide program name RSTXSCRP. click on execute.
2. Provide your form name. mode is IMPORT (UPLOAD from local drivers). click on execute
provide your path name. ENTER (Transfer).

Steps to convert SAP-SCRIPT OUTPUT to PDF format:

This is the two step procedure.
1. Create SPOOL Request
2. Convert SPOOL to PDF
NOTE: RSTXPDFT4 is the standard report which is used to convert SPOOL TO PDF.

Steps to create SPOOL:

Execute Driver Program. provide input. click on execute. provide output device LP01. select the
Check box NEW SPOOL REQUEST. click on print.

Steps to identify the SPOOL:

Execute SP02. identify the SPOOL number. Or In Menu bar Click on SYSTEM ->
OWN SPOOL REQUEST.

Steps to convert SPOOL to PDF:

Execute SE38. Provide program RSTXPDFT4. Execute. provide your path and click on transfer.

Control Commands:

1. INCLUDE
2. DEFINE
3. ADDRESS………..ENDADDRESS
4. PROTECT………..ENDPROTECT
5. TOP………………ENDTOP
6. BOTTOM………...ENDBOTTOM
7. IF………………….ENDIF
8. CASE……………..ENDCASE
9. NEW-PAGE
10. SET DATE/TIME MASK
11. PERFORM……….ENDPERFORM
12. NEW-WINDOW

1. INCLUDE:

Include command is used to include the standard text which is defined in the SO10 transaction.
Steps to define Standard Text:
Execute SO10 transaction. Provide your standard text name. click on create and provide your text
information save.

Steps to include the Standard Text in the PAGE WINDOW:

Execute SE71. Open the Form in Change mode. Click on page window. click on text element.
place the cursor where you want place the standard text. click on Insert-> Activate.
Syntax: /: INCLUDE <std text name> OBJECT <obj name> ID <idname>.

2. DEFINE:

Define command is used to declare the variables in the page window.
Syntax: /: DEFINE &<variable name>&
Example: /: DEFINE &dob& = 'feb21‘

3. ADDRESS………..ENDADDRESS:

Address…Endaddress is used to print the Address in the format of Target country.
/: ADDRESS
* &WA_KNB1-NAME1&
* &WA_KNB1-ORT01&
* &WA_KNB1-STRAS& ―Street
* &WA_KNB1-ORT02&
* &WA_KNB1-PSTLZ& ―Postal code
* &WA_KNB1-LAND1&
/: ENDADDRESS


4. PROTECT………..ENDPROTECT:

Protect…Endprotect is used to print the continuous text with out any page break.
First it checks the each and every page to print the continuous text. if there is no space is available
for all the pages then the system breaks the text and prints it.
/: PROTECT
* SURYA
* PRAVEEN
* SRI
/: ENDPROTECT

5. TOP………………ENDTOP:

Top…ENDTOP is used to print the heading in the main window.

/: TOP
* SURYA PRAVEEN SRI
/: ENDTOP

6. BOTTOM………...ENDBOTTOM:

BOTTOM…ENDBOTTOM is used to print the footer information in the main window.

/: BOTTOM
* PRAVEENASURYA
/: ENDBOTTOM
NOTE: TOP…ENDTOP & BOTTOM…ENDBOTTOM are works with in the main window only.

7. IF………………….ENDIF:

If…Endif functionality is similar as in the ordinary ABAP (Reports).

8. CASE…………ENDCASE:

Case...Endcase functionality is similar as in the ordinary ABAP (Reports).

9. NEW-PAGE:

New page command is used to break the page.

/: IF &WA_KNB1-KUNNR& = 218
* NEW-PAGE
/: ENDIF

10. SET DATE/TIME MASK:

Set date/time mask command are used to display the data and time in different formats.

Syntax:
/: SET DATE MASK = 'MMDDYYYY'
* DATE &DATE&
/: SET TIME MASK = 'HHMMSS'
* TIME &TIME&

11. PERFORM…ENDPERFORM:

This command is used to adding some additional logic to the standard driver program without
disturbing the standard driver program.

Syntax:

/: PERFORM <FORM NAME> IN PROGRAM <PROGRAM NAME>
/: USING &INPUT1&
/: USING &INPUT2&
/: "
/: "
/: CHANGING &OUTPUT1&
/: CHANGING &OUTPUT2&
/: "
/: "
/: ENDPERFORM

12. NEW-WINDOW:

NEW-WINDOW is used to call the next window.
* NEW-WINDOW

Difference between MAIN WINDOW and VARIABLE WINDOW:

Working with boxes and lines:

BOX is a command is used to draw the table vertical lines and horizontal lines.


Steps to Create Paragraph format:

1. Click on paragraph format in the application tool bar. provide paragraph format name <sp>.
Enter. 
2. Provide short description. provide left margin. alignment.
3. Provide FONT size. FONT position and TAB POSITIONS.

Objective:


ABAP Editor Logic:

PARAMETER : P_EBELN LIKE EKKO-EBELN.

DATA : BEGIN OF WA_EKKO.
 EBELN LIKE EKKO-EBELN.
 LIFNR LIKE EKKO-LIFNR.
 BUKRS LIKE EKKO-BUKRS.
 END OF WA_EKKO.

DATA IT_EKKO LIKE TABLE OF WA_EKKO.

DATA : BEGIN OF WA_LFA1.
 LIFNR LIKE LFA1-LIFNR.
 NAME1 LIKE LFA1-NAME1.
 ORT01 LIKE LFA1-ORT01.
 STRAS LIKE LFA1-STRAS.
 LAND1 LIKE LFA1-LAND1.
 END OF WA_LFA1.

DATA IT_LFA1 LIKE TABLE OF WA_LFA1.

DATA : BEGIN OF WA_T001.
 BUKRS LIKE T001-BUKRS.
 BUTXT LIKE T001-BUTXT.
 ORT01 LIKE T001-ORT01.
 LAND1 LIKE T001-LAND1.
 END OF WA_T001.

DATA IT_T001 LIKE TABLE OF WA_T001.

DATA : BEGIN OF WA_EKPO.
 EBELN LIKE EKPO-EBELN.
 EBELP LIKE EKPO-EBELP.
 MENGE LIKE EKPO-MENGE.
 MEINS LIKE EKPO-MEINS.
 NETPR LIKE EKPO-NETPR.
 END OF WA_EKPO.

DATA IT_EKPO LIKE TABLE OF WA_EKPO.

DATA W_TOTAL LIKE EKPO-NETPR.

SELECT SINGLE EBELN LIFNR BUKRS FROM EKKO INTO WA_EKKO WHERE EBELN =
P_EBELN.
SELECT SINGLE LIFNR NAME1 ORT01 STRAS LAND1 FROM LFA1 INTO WA_LFA1 WHERE
LIFNR = WA_EKKO-LIFNR.

SELECT SINGLE BUKRS BUTXT ORT01 LAND1 FROM T001 INTO WA_T001 WHERE
BUKRS = WA_EKKO-BUKRS.

SELECT EBELN EBELP MENGE MEINS NETPR FROM EKPO INTO TABLE IT_EKPO WHERE
EBELN = WA_EKKO-EBELN.

LOOP AT IT_EKPO INTO WA_EKPO.
W_TOTAL = W_TOTAL + WA_EKPO-NETPR.
ENDLOOP.

CALL FUNCTION 'OPEN_FORM'
EXPORTING
FORM = 'YANUSHA_FORM5'.
CALL FUNCTION 'WRITE_FORM'
EXPORTING
WINDOW = 'TITLE'.
CALL FUNCTION 'WRITE_FORM'
EXPORTING
WINDOW = 'VENDOR'.
CALL FUNCTION 'WRITE_FORM'
EXPORTING
WINDOW = 'COMPANY'.

LOOP AT IT_EKPO INTO WA_EKPO.

CALL FUNCTION 'WRITE_FORM'
EXPORTING
ELEMENT = 'MAIN'
WINDOW = 'MAIN'.
ENDLOOP.

CALL FUNCTION 'WRITE_FORM'
EXPORTING
WINDOW = 'FOOTER'.

CALL FUNCTION 'CLOSE_FORM'.


NOTE: SPELL_AMOUNT is the function module which is used to print the amount in words.
The inputs for this function module are AMOUNT and CURRENCY.
The output for this function module is AMOUNT in WORDS.

NOTE: In the Real time based on the page. BASIS people create the page format as well as output device. Based on these two things we develop the LAYOUT.

NOTE: In real time when ever we are working with LABELS we split the MAIN window depends on
label size.
Steps to Print The Output In Both Sides:

1. Execute SE71 Transaction, Provide your form name, Click on change mode.
2. Click on pages in the application tool bar.
3. Print attributes, Print mode D.

Steps to Access Multiple Layouts or Forms In The Same Driver Program (Or) Print Program:

1. Create an executable program and implement all the retrieving logic.
2. Access the layouts from the driver program by using OPEN_FORM function module. Input for
the above function module FORM NAME (Optional).
3.
I. Start the each form by using START_FORM function module. Input is FORM NAME.
II. Transfer the data from driver program to particular page window by using
 ' WRITE_FORM' function module. Input is WINDOW NAME. Repeat the same step II for
all the page windows.
III. End each form by using 'END_FORM‘ function module. Repeat the same step 3 for each
form.
4. Close the form by using 'CLOSE_FORM' function module.

OPEN_FORM
 START_FORM
  WRITE_FORM
  WRITE_FORM
 END_FORM
 START_FORM
  WRITE_FORM
  WRITE_FORM
 END_FORM
 START_FORM
  WRITE_FORM
  WRITE_FORM
  WRITE_FORM
 END_FORM
CLOSEFORM

NOTE: Without a CLOSE_FORM we can‘t print the output.

Steps to Debug The Sap-Script:

METHOD1:

1. Execute SE71 Transaction. Provide form name.
2. In the menu bar -> UTILITIES -> ACTIVE DEBUGGER (Here only current form is in
debugging mode).
3. Execute the program. Provide sample input. Execute. ENTER.
4. Press F5 and identify the values.

METHOD2:

1. Execute SE38
2. Provide program name RSTXDBUG.
3. Execute the program. Provide sample input. Execute. ENETR.
4. Press F5 and identify the values.
NOTE: TTXFP is the standard database table which contains form names as well as their driver
programs (Here sub programs are available).
NOTE: TNAPR is the standard database table which contains applications, layouts and driver
programs (Main program).

Working With Standard Scripts:

The function of this standard script is
1. Change the layout
2. Adding some additional logic to the driver program.
NOTE: NACE is the Transaction which contains all the applications, output types, their forms
and Driver Programs.

The output type is designed by the functional people. Each application having number of output
types depending on the document type.
Each output contains

a. Driver program
b. Layout

Steps to Change The Existing Layout:

STEP1: Identify the standard layout.
STEP2: Copy the standard form into 'Z' form.
STEP3: Convert the original language to our required language.
STEP4: Change the layout as per client requirement.
STEP5: Place the new layout in the NACE Transaction.

STEP1 Steps to Identify the Standard Layout:

1. Execute NACE transaction
2. Select your application
3. Click on output types in the application toolbar.
4. Select your output type which is given by functional people (NEU-New PO Print out).
5. Double click on processing routines in the left panel and identify the standard form (Example:
MEDRUCK).

STEP2 Steps to Copy the Standard Form Into 'Z' Form:

1. Execute SE71.
2. In the menu bar click on utilities -> COPY FROM CLIENT.
3. Provide your form name which is identified by the Standard form.
4. Provide -  Source client : 000
                     Target form   : <z-form>
5. Click on execute, Local object.

STEP3 Steps to Convert the Original Language to Our Required Language:


STEP4 Steps to Change the Layout as Per Client Requirement:

1. Execute SE71.
2. Provide your form name, Language-EN, click on change mode.
3. In the application toolbar click on window tab.
4. Go to menu bar -> EDIT -> CREATE ELEMENT. Provide window name. Short description.
5. Click on page windows tab. In the menu bar click on EDIT -> CREATE ELEMENT.
6. Double click on your window. Provide Coordinates.
7. SAVE CHECK ACTIVATE the form.

STEP5 Steps to Place the new layout in the NACE Transaction:

1. Execute the NACE Transaction.
2. Select your application. Click on output types in the application toolbar.
3. Select the output type NEU(NEW PO printout)
4. Double click on PROCESSING in the left panel. Click on change mode (display). Remove the
old form. Place the new form. SAVE.
In ME23N texts -> Header text -> Click on print preview

Steps to Provide Message In The Purchase Order:

1. Execute ME22N.
2. Provide your PO (purchase order) number.
3. Click on messages in the application toolbar.
a. Provide output type
b. Select the medium printout
ENTER
4. Click on communication method in the application toolbar

Printing the Information:

 Provide the logical destination LP01, BACK, SAVE.

Format Options:
 
 1. Offset
 2. Output length
 3. Omitting leading zeros
 4. Omitting leading sign
 5. Leading sign at right
 6. Leading sign at left
 7. Compress the text
 8. Number of decimal places
 9. Remove the separators in thousand
 10. Avoid the conversions.


SMARTFORM:

Smart forms are used to design the business documents such as purchase order, sales order, invoice, Performa etc.
Smart forms are introduced from 4.6c version onwards. It also supports output mode as 'EMAIL'.

Components of Smart forms:

1. Smart form layout.
2. Function module.
3. Print layout.

Components of the smart forms layout:

1. Global settings.
2. Pages and windows.

Components of Global settings:

1. Form attributes
2. Form interface
3. Global definition

Form attributes:
Form attributes contain header information i.e.
Form name
Language
Page format
Created by…………..

Form interface: 

this is used to declare the variables, work area and internal tables which we need to
transfer the data from print program to layout.

Global definition: this is used to declare the variables, work-area and internal table which are used to
implement the logic in the layout.

PAGES: page is the physical area where we place the window. We can‘t print the text in the page.

WINDOWS: we can place the same window in 'n' number of pages but we can‘t print the data directly
on the window.

Procedure of Smart Form:

1. Based on the client requirement we design the smart form layout by using SMARTFORMS tcode.
2. After activating the smart form it generates a function module.
3. Based on the function module we develop the print program.

NOTE: Printing the data on the page window is always through symbols.

There are four types of symbols.

1. Program symbols
2. System symbols
3. Standard symbols
4. Text symbols.

Each symbol starts with '&' ends with '&'.

Differences between Sap scripts and Smart forms:


Steps To Create Te Smart Form: 


Working with Logo:
We can work with .tiff or .BMP image only.

NOTE:

1. When ever we are working with .tiff image then convert .tiff image into TEXT image.
2. RSTXPDFT4 is the standard program which converts tiff to TEXT image.
3. When ever we are working with .BMP image then convert .BMP image into GRAPHICS image.
4. SE78 is the Transaction code to convert .BMP image to GRAPHICS image.

Steps to convert .BMP to GRAPHICS:

1. Execute SE78, Expand graphics in the left panel, Double click on BMAP.
2. Provide your graphics name, select the radio cotton color, and click on import (F5) in the
application tool bar.
3. Provide your image path, ENTER.

Steps to Provide Ms-Word as Text Editor in Smart form Or Sap script:

1. Execute I18N t-code.
2. Expand I18N customizing. Double click on MS-WORD as editor.
3. select the checkboxes
SAPSCRIPT and SMARTFORMS
4. Click on activate.
(This is possible only after configuring the system).

Steps to Maintain the Backup (Or) Download the Smart form Layout:

1. Execute SMARTFORMS t-code
2. Provide your smart form name which you want to download.
3. In the menu bar click on utilities -> download form, ENTER
4. Provide file name, SAVE.

Steps to Reload the Smart forms (Or) Upload the Smart forms:

1. Execute SMARTFORMS t-code
2. Provide your smart form name and click on delete, yes.
3. In the menu bar click on utilities -> upload form, Provide your form name, ENTER.
4. Browse the file, click on LOCAL OBJECT.

NOTE:

Whenever the smart form is transported from development server to quality server and production server the function module name never transport.


NOTE:

SSF_FUNCTION_MODULE_NAME is the function module which is used to generate the function module based on the smart form.
Input for this function module is Smart form name.
Output for this function module is function module name.

NOTE:

If you want to declare the select-options in the SMART-FORMS then we must create a structure with four fields.


Steps to Create The Structure:

1. Execute SE11.
2. Select the radio button data type, Provide your structure name, click on create.
3. Select the radio button structure, Provide short description.
4. Click on predefined type (built-in-type), Provide the components.


OBJECT: Based on the company code displaying the customers under company Steps to Create Smart form:

1. Execute SMARTFORMS t-code
2. Provide your SMARTFORM name, click on create, Provide short description.
3. In the left panel click on form interface, under tables tab, Declare the select option
S_BUKRS LIKE <STRUCTURE NAME>
4. Double click on global definitions in left panel, under types tab declare TYPES.

TYPES: BEGIN OF TY_FINAL,
BUKRS LIKE T001-BUKRS,
BUTXT LIKE T001-BUTXT,
KUNNR LIKE KNB1-KUNNR,
END OF TY_FINAL.

5. Click on global definitions, under global data tab, declare the WA and IT.

WA_FINAL TYPE TY_FINAL
IT_FINAL TYPE TABLE OF TY_FINAL

6. Click on INITIALISATION tab, Provide input and output parameters and implement the logic.
Input                  output
S_BUKRS          IT_FINAL

Logic:

SELECT T001~BUKRS T001~BUTXT KNB1~KUNNR INTO TABLE IT_FINAL FROM T001
INNER JOIN KNB1 ON T001~BUKRS = KNB1~BUKRS WHERE T001~BUKRS IN S_BUKRS.

7. Select the main window in the left panel, Right click -> create -> low logic -> loop.
Double click on loop icon, in data tab provide

IT_FINAL INTO WA_FINAL

8. Select the loop in the left panel -> right click -> create -> text.

Text icon is created under main window.
Double click on text icon, click on text editor -> Provide the data.

&WA_FINAL-BUKRS& &WA_FINAL-BUTXT& &WA_FINAL-KUNNR&
SAVE, CHECK, ACTIVATE the form.

9. In the menu bar click on environment -> function module name.

10. Based on the function module develop the print program in ABAP editor

ABAP Editor:

DATA: FN_MODULE TYPE RS38L_FNAM.
DATA V1 LIKE T001-BUKRS.
SELECT-OPTIONS SO_BUKRS FOR V1.

CALL FUNCTION 'SSF_FUNCTION_MODULE_NAME'
EXPORTING
FORM NAME = <FORM NAME>
IMPORTING
FM_NAME = FN_MODULE .
CALL FUNCTION FM_MODULE
TABLES
S_BUKRS = SO_BUKRS .

(Here RS38L_FNAM is structure name of the function module
SSF_FUNCTION_MODULE_NAME, this is obtained by providing the function module name in
SE37 t-code. under export tab, you can get the structure name. you have to provide this because you
are creating structure for select-options.)

Steps To Convert Sap script Layout to Smart Form:

METHOD-1:

1. Execute SMARTFORMS t-code. provide your smart form name.
2. In the menu bar click on utilities -> migration -> import sap script form.
3. Provide your script form name, ENTER.
4. SAVE, CHECK, ACTIVATE the form.

METHOD-2:

FB_MIGRATE_FORM is the function module which is used to convert script layout to smart
form.
Here provide the function module name in SE37 and click on display and execute and provide your
script and target smart form name and execute and save. The script will converted into smart form.

Steps to convert SAP-SCRIPT OUTPUT to PDF format:

This is the two step procedure.
1. Create SPOOL Request
2. Convert SPOOL to PDF

NOTE: RSTXPDFT4 is the standard report which is used to convert SPOOL TO PDF.

Steps to create SPOOL:

Execute Driver Program, provide input, click on execute, provide output device LP01, select
the Check box NEW SPOOL REQUEST, click on print.

Steps to identify the SPOOL:

Execute SP02, identify the SPOOL number. Or In Menu bar Click on SYSTEM ->
OWN SPOOL REQUEST.

Steps to convert SPOOL to PDF:

Execute SE38, Provide program RSTXPDFT4, Execute, provide your path and click on transfer.

Working With Smart Styles:

1. Smart styles are used to design the paragraph and character formats.
2. The T-code is SMARTSTYLES.

Steps To Create Paragraph & Character Format:

Paragraph Format:
1. Execute smart style T-code.
2. Provide your style name, click on create, Provide short description.
3. In the left panel select the paragraph formats. Right click -> create node, Provide
paragraph format name <P1>, ENTER.
4. Provide short description, under font tab provide

5. Under tabs tab, Provide tab positions Repeat the same for all the paragraph formats.

Character Formats:

6. In the left panel select character formats right click -> create node, provide your
character format name <C1>.
7. Provide short description, Under font tab provide

Repeat the same for all the character formats
8. In the left panel double click on the header data-Standard settings-Standard paragraph P1
SAVE, CHECK, ACTIVATE the SMARTSTYLES.


Logic:

SELECT SINGLE EBELN LIFNR FROM EKKO INTO WA_EKKO WHERE EBELN =
P_EBELN.

SELECT SINGLE LIFNR ADRNR FROM LFA1 INTO WA_LFA1 WHERE LIFNR=
WA_EKKO-LIFNR.

SELECT EBELN EBELP MENGE MEINS NETPR FROM EKPO INTO TABLE IT_EKPO
WHERE EBELN = P_EBELN.

5. Under main window in the left panel select the page right click -> create -> address.
6. Double click on address, Provide address number.
&WA_LFA1_ADRNR&
7. In the left panel select address Right click -> create -> graphics.
In the left panel double click on the graphics
NAME <SURYA>
OBJECT GRAPHICS
ID BMAP
Select the radio button bitmap image

8. Select the main window in the left panel, right click -> create -> table.
Under the tables tab, select the line right click -> rename the line -> provide new name,
ENTER.
In the left panel select double click on pages and windows, in the left most corner you
will find details, double click and provide cell widths as required.
Click on the data tab.

LOOP:
Internal table IT_EKPO      INTO       WA_EKPO

9. Select the header in the table left panel Right click -> create -> table line. Select the line type
as LINE1 which name you have given in the 8th step.
In the left panel you can see cells under header
Click on 1st cell -> right click -> create -> text.
Double click on the text Click on general attributes tab, Click on text editor. P1 PUR.DOC
Provide your first column cell name (Repeat the same for all the cells).

10. elect the Main area in the left panel, Right click -> create -> table line (this is for providing
data in the columns in the main area 6 more cells will be provide under main area)
11. Select the first cell right click -> create -> text.
Double click on text, click on text editor, Provide data.
P2 &WA_EKPO-EBELN&
Repeat the same step 12 for all the cells.
In the left panel select the net price. Right click -> create -> flow logic -> program lines.
Double click on the code in the left panel.
Input                  output
EKPO-NETPR   W_TOTAL
W_TOTAL = W_TOTAL + WA_EKPO-NETPR
Under main window in the left panel, select the table in the left panel select the first line,
Right click -> insert -> empty line underneath (creates empty space for footer)

12. Select the new line right click -> rename line -> provide new name, ENTER.

13. Click on table Select the pattern, by clicking on the top most right corner.
Click on display framed patterns Select your pattern.

14. Select the footer in the left panel right click -> create -> table line. Select the line.
Select the cell -> create -> text.
Click on text editor provide data with its paragraph.
P3 TOTAL &W-TOTAL(C) & Here C refers to COMPRESS i.e. no space is provided.

15. SAVE ,CHECK ACTIVATE the form

16. In the menu bar -> click on environment -> function module.

17. Based on the function module develop the print program in ABAP editor.

ABAP Editor:

DATA FN_MODULE TYPE RS38L_FNAM.
PARAMETER PR_EBELN LIKE EKKO-EBELN.
CALL FUNCTION ‗SSF_FUNCTION_MODULE_NAME‘
EXPORTING
FORM NAME = <FORM NAME>
IMPORTING
FM_NAME = FN_MODULE .
CALL FUNCTION FM_MODULE
TABLES
P_EBELN = PR_EBELN .

Events in Internal Table or Control Break Statements:

1. AT FIRST
2. AT LAST
3. AT NEW <field name>
4. AT END OF <field name>


These events are work with in the LOOP…ENDLOOP of the internal table. Each event ends with
ENDAT.

NOTE: Before using these events we must sort the internal table based on the new field.

AT FIRST: This is the event which is triggered at the first record of the internal table
Advantage: This is used to print the heading.

AT LAST: This is the event which is triggered at the last record of the internal table.
Advantage: This is used to print the grand totals.

AT NEW: This is the event which is triggered at the new record of each block.
Advantage: This is used to print the individual heading of each record.

AT END OF: This is the event which is triggered at the last record of each block.
Advantage: This is used to print the subtotals.

REQUIREMENT:


Logic:

LOOP AT IT_EKPO INTO WA_EKPO.
AT FIRST.
WRITE /‘PURCHASING DOCUMENTS‘.
ENDAT
AT NEW EBELN.
WRITE /WA_EKPO-EBELN.
ENDAT
WRITE : / WA_EKPO-EBELP,WA_EKPOMENGE,WA_EKPO-MEINS, WA_EKPONETPR.
S_TOTAL = S_TOTAL + WA_EKPONETPR.
G_TOTAL = G_TOTAL + WA_EKPONETPR.
AT END OF EBELN.
WRITE: /‘SUBTOTAL‘, S_TOTAL.
CLEAR W_STOTAL.
ENDAT.
ATLAST
WRITE: / „GRANDTOTAL IS‘ G_TOTAL.
ENDAT.
ENDLOOP.

BDC
(Batch Data Conversions/Communication)

BDC is used to upload the data from the flat file to their particular Database table. Writing a BDC Program is nothing but automate existing transaction code. Each transaction can create only one record at time. If we want to create thousands of records one way execute the same transaction thousand thousands of time, another way is develop BDC Program to automate the existing Transaction code.

Some of the Important Transaction code:

1. XK01/MK01/FK01 – Create Vendor.

XK01 – Central
MK01 –Material wise
FK01 - Finance
XK02/MK02/FK02 – Change Vendor.
XK03/MK03/FK03 – Display Vendor.

2. XD01/VD01/FD01 – Create Customer

XD02/VD02/FD02 – Change Customer
XD03/VD03/FD03 – Display Customer

3. MM01 – Create Material
MM02 –Change Material
MM03 – Display Material

4. ME21N – Create Purchasing Order
ME22N – Change Purchasing Order
ME23N – Display Purchasing Order

5. VA01 – Create Sales Order
VA02 – Change Sales Order
VA03 – Display Sales Order

6. KS01 – Create Cost Centre
KS02 – Change Cost Centre
KS03 – Display Cost Centre

7. KE51 – Create Profit Centre
KE52 – Change Profit Centre
KE53 – Display Profit Centre

8. CS01 – Create BOM
CS02 – Change BOM
CS03 – Display BOM

9. VL01 – Create Delivery
VL02 – Change Delivery
VL03 – Display Delivery

10. VF01 – Create Billing
VF03 - Change Billing   
VF03 – Display Billing

11. ME51N – Create Purchase Requisition
ME52N – Change Purchase Req.
ME53N – Display Purchase Requisition

12. MB01 – Create Material Delivered
MB02 – Change Material Delivered
MB03 – Display Material Delivered

13. COR1 – Create Process Order
COR2 – Change Process Order
COR3 – Display Process Order

14. CO01 – Create Production Order
CO02 – Change Production Order
CO03 – Display Production Order

15. C201 – Create Recipe
C202 – Change Recipe
C203 – Display Recipe

16. MSC1N – Create Batches
MSC2N – Change Batches
MSC3N – Display Batches

17. FB01 – Create Accounting Document
FB02 – Change Accounting Document
FB03 – Display Accounting Document

18. FI01 – Create Bank
FI02 – Change Bank
FI03 – Display Bank

19. KSH1 – Create Cost Centre Group
KSH2 – Change Cost Centre Group
KSH3 – Display Cost Centre Group

20. CL01 – Create Class
CL02 – Change Class
CL03 – Display Class

STEPS TO DEVELOP THE BDC PROGRAM

1. Analyse the transaction code that means analyse the each and every screen and their field
information.
2. Extract the data from Non – SAP to Flat file.
3. Upload the data from flat file to Internal Table /BDC Program.
4. For Each record in the internal table, we collect the screen and field details to automate the
existing transaction.
5. Call the transaction for each and every record in internal table.

STEPS IN DETAIL:

STEP 1: Analyse the Each and Every screen and their fields Information is nothing but
collect the Technical information of each screen and field.
If you want identify the technical information of field then go to transaction place the
cursor on the field, click on F1, and click on Technical Information. It is very difficult
to identify the technical information entire transaction, so we go for SHDB.
Note:
SHDB transaction code which collects technical information of the entire transaction
(RECORDING).

STEPS TO THE RECORDING:


It is function module which is used to browse the file and as well as upload the data to
internal table. The input for above function module is FILE TYPE = ‘DAT’ the output for
the function module is an internal table which is similar as Flat File.

Program:
*---------------------------------------------------------------------*
*WORKING WITH FILES USING UPLOAD FM *
*---------------------------------------------------------------------*

REPORT YRAKESH_FILE1_UPLOAD.

DATA: BEGIN OF WA_FILE,
 BUKRS LIKE T001-BUKRS,
 BUTXT LIKE T001-BUTXT,
 ORT01 LIKE T001-ORT01,
 END OF WA_FILE.

DATA IT_FILE LIKE TABLE OF WA_FILE.

CALL FUNCTION 'UPLOAD'
EXPORTING
 FILETYPE = 'DAT'
 TABLES
 DATA_TAB = IT_FILE
 .
LOOP AT IT_FILE INTO WA_FILE.
WRITE: / WA_FILE-BUKRS, WA_FILE-BUTXT, WA_FILE-ORT01.
ENDLOOP.

GUI_UPLOAD:

It is function module which uploads data from Flat File to Internal Table. The input for the above function module is File Name. The output above function module is Internal Table which similar as Flat File.

F4_FILENAME:
It is function module is used to browse the file the output for the function module is
filename.

AT SELECTION-SCREEN ON VALUE-REQUEST:
It is an Event which is triggered at the time of user clicks F4 button.

Program 2:
*---------------------------------------------------------------------*
*PROG TO UPLOAD DATA FROM FLAT FILE TO INTRENAL TABLE USING
GUI_UPLOAD
*FM
*---------------------------------------------------------------------*

REPORT YRAKESH_FILE2_GUI_UPLOAD.

DATA: BEGIN OF WA_FILE,
 BUKRS LIKE T001-BUKRS,
 BUTXT LIKE T001-BUTXT,
 ORT01 LIKE T001-ORT01,
 END OF WA_FILE.

DATA IT_FILE LIKE TABLE OF WA_FILE.
DATA V1 TYPE STRING.
PARAMETER P_FILE LIKE IBIPPARMS-PATH.
AT SELECTION-SCREEN ON VALUE-REQUEST FOR P_FILE.
 CALL FUNCTION 'F4_FILENAME'
 IMPORTING
 FILE_NAME = P_FILE.

 START-OF-SELECTION.
 V1 = P_FILE.

 CALL FUNCTION 'GUI_UPLOAD'
 EXPORTING
 FILENAME = V1
 HAS_FIELD_SEPARATOR = 'X'
 TABLES
 DATA_TAB = IT_FILE.

LOOP AT IT_FILE INTO WA_FILE.
WRITE: / WA_FILE-BUKRS, WA_FILE-BUTXT, WA_FILE-ORT01.
ENDLOOP.

ALSM_EXCEL_TO_INTERNAL _TABLE:

It is function module which is used to upload the data from Excel sheet to Internal
Table. The input for above function module is File Name, Begin Column, Begin Row,
End Column, and End Row. The output for above function module is an Internal table
which contains 3 fields Row, Column, Value.

Program 3
*---------------------------------------------------------------------*
*PROG TO UPLOAD DATA FROM EXCEL SHEET TO INTRENAL TABLE USING
*ALSM_EXCEL_TO_INTERNAL_TABLE FM
*---------------------------------------------------------------------*

REPORT YRAKESH_FILE3_XSEL_FM.

***DECLARE IT TABLE****

DATA: BEGIN OF WA_FILE,
 BUKRS LIKE T001-BUKRS,
 BUTXT LIKE T001-BUTXT,
 ORT01 LIKE T001-ORT01,
 END OF WA_FILE.

DATA IT_FILE LIKE TABLE OF WA_FILE.

***DECLARING IT FOR CONVERTING FM IT TO DATA IT.

DATA: WA LIKE ALSMEX_TABLINE, * XCEL FM O/P IT TYPE
 IT LIKE TABLE OF WA.

***DECLARATIONS

DATA V1 TYPE RLGRAP-FILENAME. *XCEL I/P FILENAME TYPE

PARAMETER: P_FILE LIKE IBIPPARMS-PATH. * F4_FILENAME FM
FILE_NAME TYPE
PARAMETER: P_BC TYPE I,
 P_BR TYPE I,
 P_EC TYPE I,
 P_ER TYPE I.
 AT SELECTION-SCREEN ON VALUE-REQUEST FOR P_FILE.
 CALL FUNCTION 'F4_FILENAME'
 IMPORTING
 FILE_NAME = P_FILE.

 START-OF-SELECTION.

 V1 = P_FILE.

 CALL FUNCTION 'ALSM_EXCEL_TO_INTERNAL_TABLE'
 EXPORTING
 FILENAME = V1
 I_BEGIN_COL = P_BC
 I_BEGIN_ROW = P_BR
 I_END_COL = P_EC
 I_END_ROW = P_ER
 TABLES
 INTERN = IT
 .
***LOGIC TO CONVERT XCEL FM TO OUR DATA IT.

LOOP AT IT INTO WA.
 CASE WA-COL.
 WHEN '0001'.
 WA_FILE-BUKRS = WA-VALUE.
 WHEN '0002'.
 WA_FILE-BUTXT = WA-VALUE.
 WHEN '0003'.
 WA_FILE-ORT01 = WA-VALUE.
 ENDCASE.
 AT END OF ROW.
 APPEND WA_FILE TO IT_FILE.
 ENDAT.
ENDLOOP.

***DISPLAYING OUT PUT.

LOOP AT IT_FILE INTO WA_FILE.
WRITE: / WA_FILE-BUKRS, WA_FILE-BUTXT, WA_FILE-ORT01.
ENDLOOP.

DOWN LOAD:
It is function module which is used to browse the file as well as download the data into
Internal table from File.
The input for above function module is file type = ‘DAT’ and Data Internal Table
which data you want download.

GUI_DOWNLOAD:
It is function module which is used to download data from Internal table to Present
Server.
The input for the above function module is File Name with Extension, an Internal table
which contains the data.

APPLICATION SERVER:

It is SAP Directory the transaction code for SAP Directory AL11.

Steps to Download the data into Application Server:

1. Open the file <Data set> in write mode.
2. Loop at <Data Internal Table > Into <Work Area>.
Transfer the data From <Work Area> to <File>.
 End loop.
3. Close the file '<data set>'.

SYNTAX of Open Data Set:
OPEN DATASET '<file name>' IN BINARY/TEXT FOR OUTPUT/INPUT.

SYNTAX of Close Data Set:
CLOSE DATASET‘<file name>‘.

SYNTAX of Transfer Data set:
TRANSFER <Work Area Name> TO '<File Name>'.
Note: “.” (Dot) directory default directory in AL11.

*---------------------------------------------------------------------*
*PROG TO DOWN LOAD DATA TO APPLICATION SERVER. (IN ECC 4.7) *
*---------------------------------------------------------------------*

REPORT YRAKESH_FILE4_APP_SER_DOWN.

DATA : BEGIN OF WA_T001,
 BUKRS LIKE T001-BUKRS,
 BUTXT LIKE T001-BUTXT,
 ORT01 LIKE T001-ORT01,
 END OF WA_T001.

DATA IT_T001 LIKE TABLE OF WA_T001.

SELECT BUKRS BUTXT FROM T001 INTO TABLE IT_T001.
OPEN DATASET 'RAKESH' IN TEXT MODE ENCODING DEFAULT FOR
OUTPUT.

 LOOP AT IT_T001 INTO WA_T001.
 TRANSFER WA_T001 TO 'RAKESH'.
 ENDLOOP.
CLOSE DATASET 'RAKESH'.

Steps to upload the data from Application Server:
1. Open the file (Data set) in Read mode.
2. Do
READ THE File (Data set) INTO <Work Area>.
IF SY-SUBRC = O.
APPEND <Work Area> TO <Internal Table>
ELSE
EXIT
ENDIF.
ENDO.
3. CLOSE THE File (Data Set)

PROGRAM:
<TO READ DATA SET>

STEP4:

Collect the screen and field elements nothing but fill Internal table contains five fields that is

1. PROGRAM -- Program name
2. DYNPRO – Screen number
3. DYNBEGIN – Starting Position
4. FNAM – Field Name
5. FVAL – Field Value

In Data Dictionary we have one Structure BDCDATA which contains above five fields, so that we simply declare our internal table by referring BDCDATA structure.

STEP5:

Calling the transaction is of two types

1. Call Transaction Method
2. Session Method

Call Transaction Method:

SYNTAX:

CALL TRANSACTION <Transaction Code> USING <BDC Data Int. Table>
MODE A/N/E.
Here A --> All Screens
 N  --> NO Screens
 E  --> Error Screens

Program 1:

Differences between Call transaction method and Session transaction method.


Steps to work with Session Method :

1. Create the Session by using 'BDC_OPEN_GROUP' function module.

The input for above function module is

I. GROUP – The Session name, which is used to processing the session.
II. KEEP – The session name is remained after processing the session For Active = 'X' and Inactive = ' '.
III. HOLDDATE – the Session is locked until it reaches hold date
IV. USER – Valid user name.


OBJECT:

Develop a conversion program to upload the vendor master data by using Session method the Flat file contains Vendor number, Company code, Name, Search term , recon account , Cash management group.

Steps to Process the Session :
  • Execute SM35
  • Select Session name.
  • Click on Process application tool bar.
OBJECT:

Upload the vendor as well as customer master data by using BDC session method the Vendor flat file contains vendor number, name, search term and city. The customer flat file contains customer name, Search term and city.


Error handling in Call transaction:

1. By using 'FORMAT_MESSAGE' Function module.
2. Whenever we get the errors in call transaction method the we simply pass errors into Session method
3. By using BDCMSGCOLL and T100 Database tables.

FORMAT_MESSAGE:

It is function module which is used to handle the errors in call transaction the input for the function module is message number,message id,language ,message1,message2,message3,message4 .
The output for the function module is a meaningful description .

SYNTAX of CALL TRANSACTION:

CALL TRANSACTION '< Transaction code>' USING<BDC Internal Table> MODE
'N' MESSAGES INTO <Message Internal Table Name>

Note: In DDIC we have one structure BDCMSGCOLL which contains the above fields
so we simply declare Internal Table by referring BDCMSGCOLL structure. 

SESSION OVERVIEW:

Analysis:

It is used to identify the transactions as well as their status and each screen of the transaction and their fields (Fields Information)

Process:

There are 3 types of processing modes
1.process in Foreground Mode 'A'.
2.Display Errors only Mode 'E'
3.Process in Back ground 'N'.

Statistics:

It is used display quick information about session that is how many records are successfully processed ,deleted or still to be processed .

Log:

This is used to identify the each and every step of entire session processing .

Recording:

This is used to open the transaction SHDB.

Delete:

This is used to delete the session from overview.

Lock:

This is used to lock the session

Unlock:

This is used to unlock the session.

/BEND: This command is used skip the entire processing of the session
/N: this command is used to skip the current transaction from the session processing
/DDEL: this command is used to delete the current transaction from session processing
Steps to run the Session in Back ground:

METHODE 1:

Execute SM35.
Select the Session tool bar.
Select the Radio button
Back ground.
Click on process.

METHODE 2:

Execute SE38.
Provide program name RSBDCSUB.
Execute.
Provide Session name
Execute.
Filling screen elements using subroutines

Steps to develop BDC program from Recording:

Execute SHDB.
Select Recording name
Click on PROGRAM in application toolbar
Provide PROGRAM NAME:
Select Radio button
Transfer from Recording.
Enter.
Provide TITLE:
Click on SOURCE CODE:

SYNTAX OF CONCATENATE:

CONCATNATE <Variable 1> <Variable 2> <Variable 3>......<Variable N> INTO <
Variable> SEPARATED BY < Delimiter >

E.g: DATA: A (10) TYPE C,
B (10) TYPE C,
C (10) TYPE C,
A = 'RAKESH'.
B = 'MAMIDIPELLY'.
CONCATNATE A B INTO C SEPARATED BY .
RESULT: RAKESH MAMIDIPELLY
Note: Concatenate is only possible for 'CHAR' Data types.

SYNTAX OF SPLIT:

SPLIT < Variable> AT < Delimiter > INTO <Variable 1> <Variable 2> <Variable3>......<Variable N>.

IDOC

Different types of distributing the data

 1. Send entire copy
 2. Send changes only (change pointer technique)
 3. Get entire copy

-->Send change only (change pointer technique)

- Whenever the changes occurred in the master data the standard sap itself prepare one
change document.

- SMD (shared master data) is a tool which reads the distribution model and indentifies
the interested receiver.

- If any receiver is available then it generates the change pointer for the change
document.

- The change pointer technique reads the change pointer and generates as well as
dispatch the communication IDOC to their particular receiver system.


NOTE

- Open the CDHDR the pass the obj ID as our vendor no,customer no,…and identify the obj class, changeneres.
- Open the CDPOS table and pass the obj class ,obj ID and changes which is identified in the CDHDR and get the old and new values of object.

ALE configuration steps for change pointer technique

 -Active the change pointer technique (BD61)
 -Active the msg type (BD50)
 -Generate as well as dispatch the idoc to the receiver systems.

steps to activate the change pointer technique

 -execute BD61
 - Select the check box of change pointer activate generally.
 -click on save
 -enter

steps to activate the msg type

 -execute BD50
 - identify the message type and activate select it
 -click on save

steps to generate as well as dispatch the idoc to the receiver system.
 
-execute SE38
- provide program name RBDMIDOC
-click on execute
-provide your msg type CREMAS
-execute

Get entire copy


Step to maintain the RFC destination details (IN 800 CLIENT)


Filter techniques :
  • IDOC FILTERING 
  • SEGMENT FILTERING 
  • REDUCED IDOC

IDOC FILTERING

 -Idoc filtering is always placed at the distribution model
-Before generating the communication idoc the ALE service layer reads the distribution model and identify the interesting receiver.
 -If any receivers available then it check the filtering condition whether the given input satisfy
 The filter condition or not. 
-If it satisfies then only it generate communication IDOC.

Steps to create IDOC Filtering

 Creating distribution model
 -Execute BD64
 -Expand your distribution model
 -Expand msg type
 -Double click no filter set
 -Double click on create filter group
 -Expand data filtering
 -Expand filter group
 -Double click on material type
 -Click on insert line
 -provide your material type
-Enter
-Enter
-Save

Create partner profile by using the WE 20
NOTE : IDOC filtering is used to drop the IDOC at run time.


REDUCED IDOC

 -Reduced idoc is used to drop the segment as well as fields permanently.
 -The transaction code for reduced idoc is BD53
 -Here we create a new msg type with the existing msg type.
 -Based on the new msg type configure the ALE.
 (Create distribution model , create output partner profile)

Steps to work with Reduced IDOC

 -Execute BD53
 -Provide new msg type
 -Click on create
 -Provide your reference msg type
 -Provide short description
 -Enter

Note :
 *We can‘t drop the mandatory segment which are in light green color

 -Select the required segment
 -Click on select the option in the application tool bar.
 -Double click on the segment select the fields click on select.
 -Repeat the same for all the segment .
 -Click on save.
 -With this new msg type we create the distribution model and out bound partner
profile

Difference between Segment filtering & Reduced idoc.


NOTE:

 -In the real time when ever we executing ABAP related transaction code , if we get the
error (your not authorized for the Transaction code and transaction name) in the status bar
, then we must execute SU53 transaction and take the print screen and sends to basis (or)
security people.

CUSTOM IDOC
 
ALE configuration settings for the custom idoc outbound .

1.Create segment (WE31)
2.Create idoc (WE30)
3.Create message type (WE81)
4.Link the message type to idoc type (WE82)
5.Create the port number (WE21)
6.Create the outbound partner profile (WE20)
7.Distribution model is not required if we pass control record information in the program


 Steps to link the msg type to idoc type

 -Execute WE82
 -Click on change mode
 -Click new entries in the application tool bar
 -Provide your msg type basic type extension type
 -Save

Steps to Identify the release

 -Execute SE11
 -Open the table EDIMSG
 -Click on content
 -Click on execute
 -Select the Release field
 -Click on descending

Steps to create port number
 
-Execute the WE21
 -Select transaction RFC
 -Click on create
 -Select the radio button own port
 -provide your partner name
 -Enter
 -provide short description
 - Provide RFC destination
 -Click on save


(Based on the given input we fetch the data base and place it into an in internal table)
3. Collect the control records information (Sender , Receiver ,msg type , idoc --- )
4.Generate as well as dispatch the communication idoc to their particular receivers.

Design the selection screen

DATA V1 LIKE ZVEN_EMPDET-EID.
SELECTION-SCREEN : BEGIN OF BLOCK B WITH FRAME TITLE TEXT001.
SELECT-OPTIONS S_EID FOR V1.
PARAMETER : P_MSG TYPE EDI_MESTYP OBLIGATORY ,
 P_LSYS TYPE LOGSYS.
SELECTION-SCREEN END OF BLOCK B.

Steps to identify the data element of msg type and logical system

 -Execute BD14 or BD16 or BD12
 -Place the cursor msg type
 -Click on F1
 -Click on technical setting
 -Identify the data data element

Generate the master idoc

 NOTE : Whenever we are working with custom idoc then we must declare one
internal table one internal table for data , one internal table for control record , one
internal table for communication idoc .

SOURCE CODE FOR OUTBOUND PROCEE :

DATA : IT_DATA LIKE TABLE OF EDIDD,
 WA_DATA LIKE LINE OF IT_DATA.

DATA : IT_CONT LIKE TABLE OF EDIDC,
 WA_CONT LIKE LINE OF IT_CONT.

DATA : IT_COMM LIKE TABLE OF EDIDC,
 WA_COMM LIKE LINE OF IT_COMM.

DATA : WA_SEG LIKE Z1MADHU_SEG,
 IT_SEG LIKE TABLE OF WA_SEG.

SELECT EID ENAME EWMD ETRT FROM ZVEN_EMPDET INTO TABLE
IT_SEG WHERE
EID IN S_EID.

LOOP AT IT_SEG INTO WA_SEG.
WA_DATA-SEGNAM = 'Z1V_CS'.
WA_DATA-SDATA = WA_SEG.
APPEND WA_DATA TO IT_DATA.
CLEAR WA_DATA.
ENDLOOP.

WA_CONT-MESTYP = 'ZV_CMSG'.
WA_CONT-RCVPOR = 'ZV_PORT'.
WA_CONT-RCVPRT = 'LS' .
WA_CONT-DOCTYP = 'Z1V_CID'.
WA_CONT-RCVPRN = 'LS810-SAP1'.
APPEND WA_CONT TO IT_CONT.
CLEAR WA_CONT.

LOOP AT IT_CONT INTO WA_CONT.

CALL FUNCTION 'MASTER_IDOC_DISTRIBUTE'
 EXPORTING
 MASTER_IDOC_CONTROL = WA_CONT
 TABLES
 COMMUNICATION_IDOC_CONTROL = IT_COMM
 MASTER_IDOC_DATA = IT_DATA.

commit WORK.
ENDLOOP.

 CALL FUNCTION 'REUSE_ALV_LIST_DISPLAY'
 EXPORTING
 I_CALLBACK_PROGRAM = SY-CPROG
 I_STRUCTURE_NAME = 'EDIDC'
* IMPORTING
 TABLES
 T_OUTTAB = IT_COMM.

Collect the control records information is nothing but fill an internal table whichcontains the following fields.
 
 RCVPOR –RECEIVER PORT
 RCVPRT –RECEIVER PARTNER TYPE
 RCVPRN - RECEIVER PARTNER NUMBER
 DOCTYP- IDOC TYPE
 MESTYP – MESSAGE TYPE

 SAMPLE CODE :

 WA_CONT-MESTYP = 'ZV_CMSG'.
WA_CONT-RCVPOR = 'ZV_PORT'.
WA_CONT-RCVPRT = 'LS' .
WA_CONT-DOCTYP = 'Z1V_CID'.
WA_CONT-RCVPRN = 'LS810-SAP1'.
APPEND WA_CONT TO IT_CONT.

 -Repeat the same for all the receiver

MASTER_IDOC _DISTRIBUTE is function model which is used generate as well as dispatch
 the communication idoc to their particular receiver system.

 -This function model acts like both ALE service layer as well as ALEcommunication idoc to
 their particular receiver system.
 -This function model acts like both ALE service layer as well as ALE communication layer.
 -The input for the above function model control records work area and data internal table.
 -The output for the function model is communication idoc internal table .

SAMPLE CODE

 CALL FUNCTION 'MASTER_IDOC_DISTRIBUTE'
 EXPORTING
 MASTER_IDOC_CONTROL = WA_CONT
 TABLES
 COMMUNICATION_IDOC_CONTROL = IT_COMM
 MASTER_IDOC_DATA = IT_DATA.

Test the idoc by using the WEO5. 

Post a Comment

0 Comments